3.2 WebMarshal Configuration Wizard
The first time you run the WebMarshal Console on a new installation, WebMarshal launches a wizard to gather configuration information needed to enable product functionality. For more information about the settings, refer to Chapter 9, “Managing WebMarshal Configuration.”
Complete the required information on each page of the wizard, and then click Next. Where possible, the wizard attempts to discover details automatically
For more information about the fields on any window of the Wizard, click Help.
The Wizard process includes the following steps:
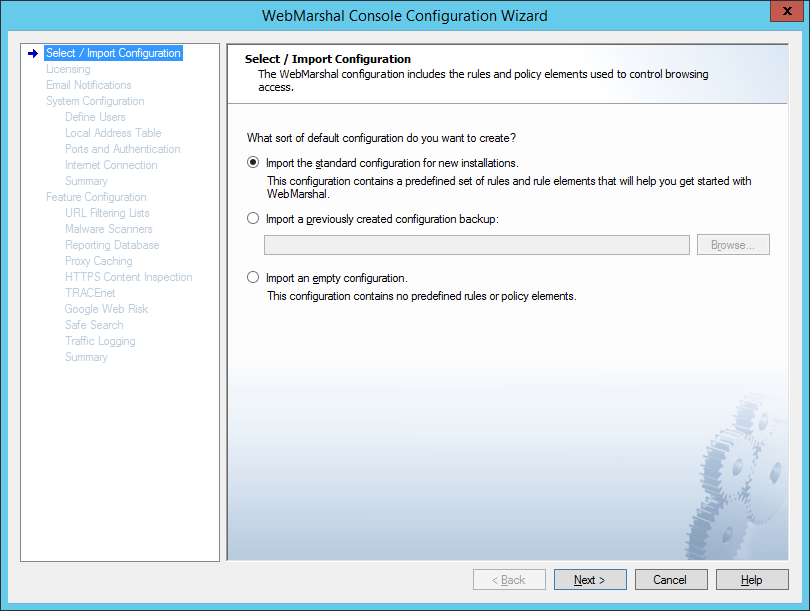
This page of the Configuration Wizard offers three options for the initial configuration.
Select an option using the radio buttons:
Figure 6: Configuration Wizard, Select Configuration window
•Import the standard configuration: Select this option to import a default configuration. This configuration includes a suggested basic Access Policy and supporting URL Categories, TextCensor Scripts, WebMarshal Groups, Classifications, and other elements. After you complete the Wizard, you can customize the policy using the Console.
•Import a configuration backup: Select this option to import a complete configuration from a file. This option is useful for disaster recovery, or if you have obtained a custom “default configuration” from another source. Enter or browse to the name of the backup file you want to import.
|
Note: When you select this option and click Next, the remainder of the Wizard is not presented. To make any changes to imported configuration, use the main Console interface. |
•Import an empty configuration: Select this option to import a configuration that contains no rules or elements. After you complete the Wizard, you can create your policy using the Console.
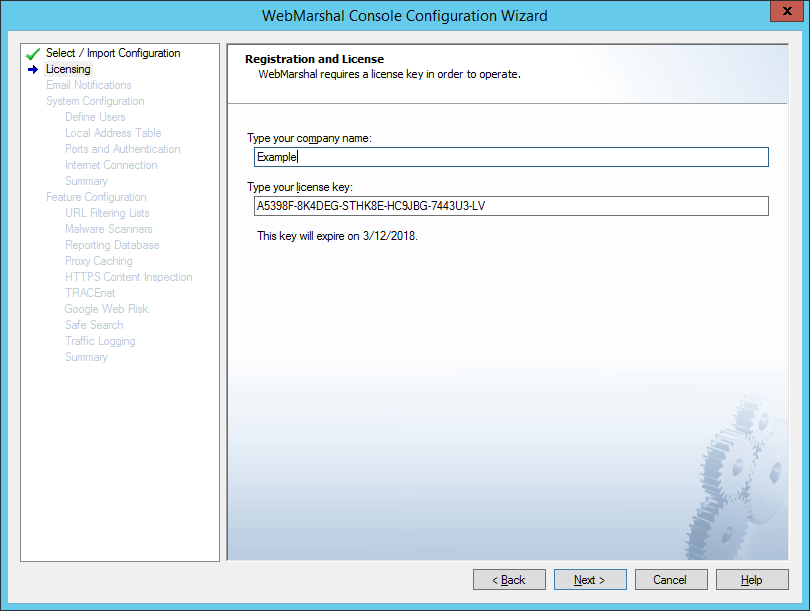
3.2.2 Registration and License
On this page of the Configuration Wizard, enter basic registration information:
1.Enter your company name.
2.WebMarshal generates a trial License Key automatically. If you have a full key, you can enter it.
3.Click Next.
Figure 7: Configuration Wizard, Registration and License window
On this page of the wizard, enter details that allow WebMarshal to send notifications about critical events and rule actions.
1.Enter the administrator's SMTP email address in the first field. WebMarshal sends administrative notifications to this address. You can enter multiple addresses, separated by semi-colons. For example:
postmaster@example.com;helpdesk@example.com
Figure 8: Configuration Wizard, Email Notifications window

2.Use the From field to enter the email address that will be used as the sender address for messages.
3.Use the Server Name field to enter the IP address or name of an email server that will accept the email message for delivery to the administrator. This server must be accessible on the network from the WebMarshal Array Manager, and it must accept email from WebMarshal for delivery to the administrator's address.
4.If the server listens for SMTP connections on a port other than port 25, enter the correct port number in the Server Port field.
5.Click Test Settings to send a test email notification.
On this page of the configuration wizard, WebMarshal attempts to detect and configure environmental items that affect connectivity and authentication.
If configuration cannot be completed automatically, WebMarshal presents a window that allows you to configure the values.
The system configuration items are:
•Users
•Local Address Table
•Ports and Authentication
•Internet Connection
For details of these items, see the following sections.
On this window, you can set up directory connectors, import user groups, and create IP range groups. WebMarshal uses this information to control user browsing permissions.
Automatic configuration attempts to create a directory connector and import a sample user group. The sample group is assigned standard browsing privileges based on the default WebMarshal rules.
Figure 9: Configuration Wizard, Define Users window
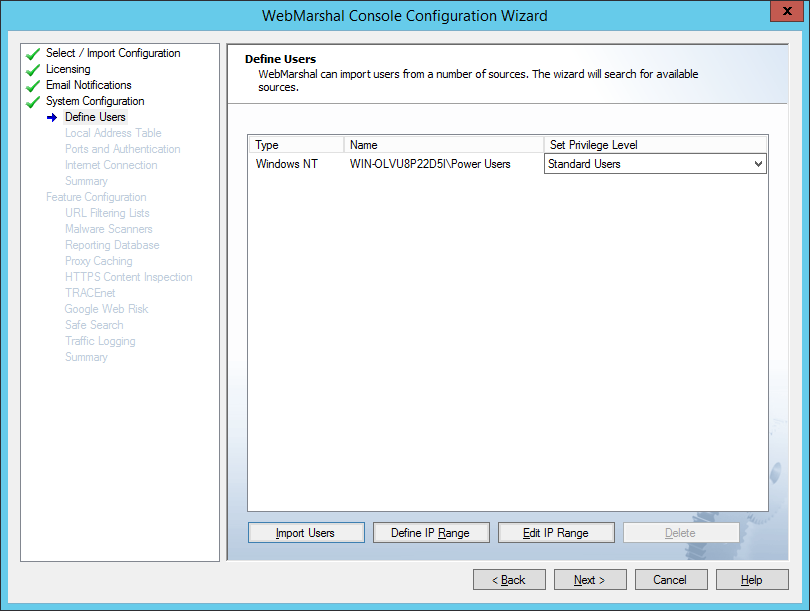
If no connector can be created, or if the connector needs login credentials, you can enter the required information. You can also add other connectors, or import additional groups. You can complete these tasks within the wizard, or in the User Groups section of the main Console.
For a production installation, you should review the connectors and imported groups to ensure that all internal users will be able to browse through WebMarshal.
For details of the fields on this window, see Help. For more information about Users and Groups, see “User Management”.
On this page, specify the range(s) of IPv4 and/or IPv6 addresses that are assigned to computers on your local network. By default, the LAT includes IPv4 address ranges that are always reserved for local use. Automatic detection adds entries based on the networking configuration of the server. If your local network uses different local IP addresses you can enter them.
|
Note: Only computers with addresses in the LAT ranges are allowed to use the WebMarshal proxy. If a computer whose IP address is not in the LAT attempts to connect, the connection will be refused with an error message. |
Figure 10: Configuration Wizard, Local Address Table window
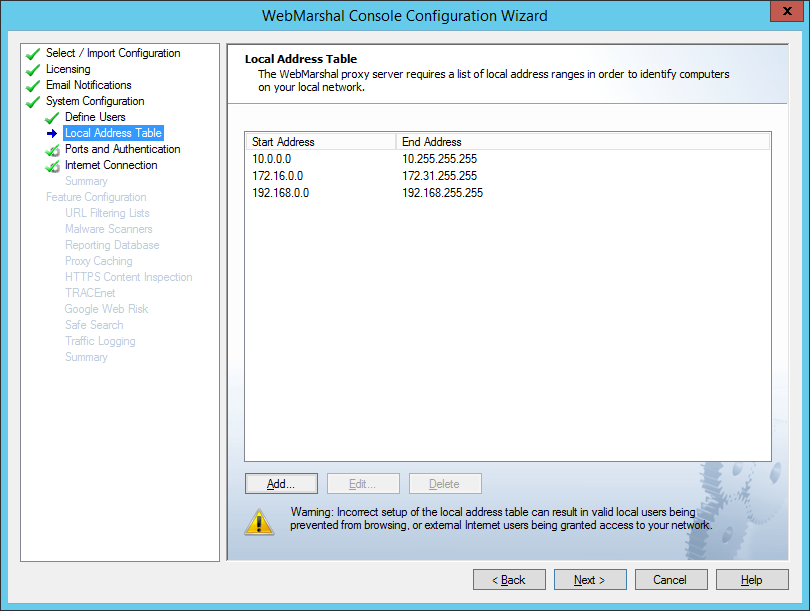
To enter a new LAT range:
1.Click New.
2.Enter a single IP address, a CIDR specification (such as the default IPv6 unique local address space fc00::/7) or starting and ending addresses of a range (such as 192.0.2.5-192.0.2.25).
3.Click OK.
To edit an existing entry, select it and then click Edit. To delete an existing entry
, select it and then click Delete.
Click Next to continue.
3.2.7 Proxy Ports and Authentication
On this page, select the server ports that WebMarshal will monitor, and the types of user authentication WebMarshal will accept on each port.
|
Note: By default WebMarshal monitors each port on all available IPv4 and/or IPv6 addresses. If the server has multiple interfaces, you can specify IP address:port combinations (for example, 10.1.2.3:8085). Caution is required when binding by IP address when in a multiple node environment. See Help for more details. |
WebMarshal checks the user account information for each request. WebMarshal supports authentication by integrated Windows authentication, Basic (clear text) authentication (including Novell NDS accounts), or computer IP address.
|
Notes: •By default WebMarshal accepts both Windows Authentication and Basic authentication on port 8080. If you are using NDS as well as Windows Authentication, Trustwave recommends you use a different port for Basic authentication of NDS users. •IP authentication normally checks the IP address of the connecting computer. IP authentication can also extract the client IP from an X-Forwarded-For header (see Trustwave Knowledge Base article Q21183). |
Be sure to adjust all clients to send their requests to the IP address and port you have selected. For instance, if you have been using Squid, which listens on port 3128 by default, you can configure WebMarshal to accept requests on this port, or reconfigure clients to use the WebMarshal default port 8080.
Figure 11: Configuration Wizard, Proxy Ports and Authentication window
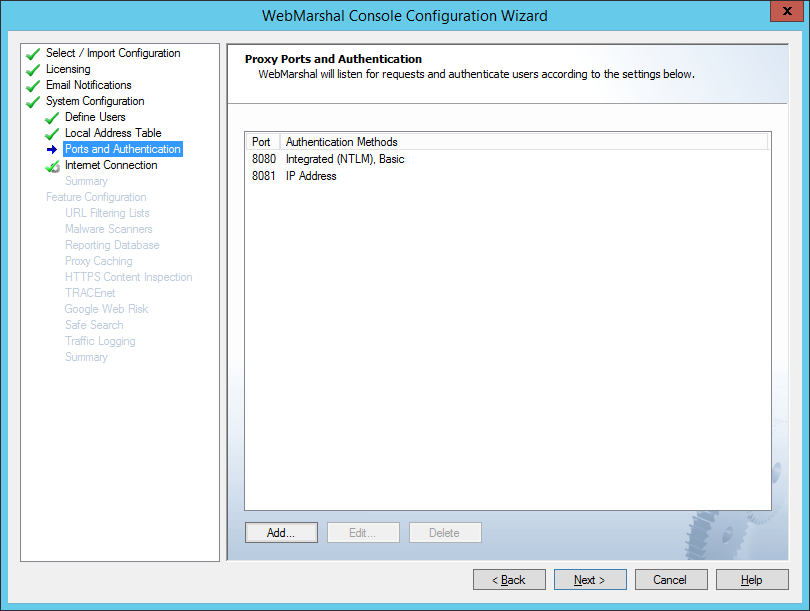
1.If you want to edit an existing port assignment, select it and then click Edit.
2.If you want to add a new assignment, click Add.
3.Enter the required information and then click OK. See Help for details.
To configure import of user account information, see the Connectors item in the main WebMarshal Console menu tree.
On this page, select the method WebMarshal will use to request material from the Web.
Figure 12: Configuration Wizard, Internet Connection window
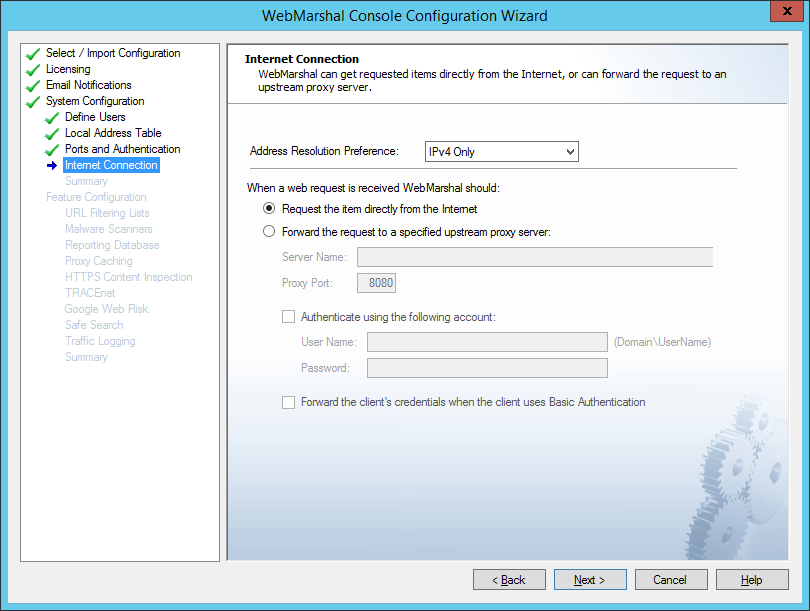
These settings define how all client browsing requests will be forwarded to external servers.
1.Choose the address resolution preference (IP protocol version to use when resolving outbound connections). This setting applies when WebMarshal resolves external websites or forward proxy names. IPv4 only is the default setting. For details of all options, see Help.
2.If WebMarshal can access the Web directly, choose the Request the page directly option. This is the default setting.
3.If WebMarshal will pass requests on to another proxy server then click the Forward option and enter the required information.
For instance, if you want WebMarshal to pass requests to SquidNT running on the same computer, you can enter localhost as the computer name and 3128 as the proxy port (SquidNT listens on port 3128 by default).
4.Check the configuration of the other proxy server to ensure that it is using the port protocol version you have specified. If the other proxy server requires authentication, you can choose to enter a user name and password, and/or forward the client’s credentials. See Help for details.
5.You can choose to resolve names to IPv4 and/or IPv6 addresses. IPv4 is the default. See Help for details.
If your environment includes another proxy server, be sure to set up the other proxy software to accept requests only from WebMarshal. If you do not, then users may be able to bypass WebMarshal rules. You can configure the LAT settings on the other proxy server, or set the other proxy software to accept requests only from a specific Windows account, which is only used by WebMarshal.
3.2.9 System Configuration Summary
On this window you can review the system configuration settings that have been automatically detected or manually configured. Each section of the window summarizes the information entered on one of the previous windows of the Wizard. To see more details or edit the information, click Edit for the section.
To continue with feature configuration, click Next.
|
Tip: The tree at the left of the window shows: • • |
On this page of the configuration wizard, WebMarshal attempts to detect and configure items that enhance the filtering abilities of the product.
If configuration cannot be completed automatically, WebMarshal presents a window that allows you to configure the values.
The system configuration items are:
•URL Filtering Lists
•Malware Scanners
•Reporting Database
•Proxy Caching
•HTTPS Content Inspection
•TRACEnet
•Safe Search
•Google Web Risk
•Traffic Logging
For details of these items, see the following sections.
On this window, you can configure WebMarshal to use one or more externally maintained categorized lists of URLs. When a filtering list is configured here, you can use the categories that it provides in WebMarshal Rules and reporting.
For details of the available lists, see Chapter 12, “WebMarshal and Filtering Lists.”
The FileFilter list is enabled by default. If the installed Product Key supports the Trustwave Web Filter Database, auto-detection enables this item.
On this window, you can configure WebMarshal to use one or more third-party products to scan traffic for viruses or other malware activity. When a scanner is configured here, you can enable WebMarshal Rules to perform scanning.
Auto-detection searches for and adds supported scanners that are installed on the server.
|
Note: Because auto-detection only adds scanners that are ready to use immediately, scanners that have just been installed might not be auto-detected if they have not yet downloaded a full set of scanning signatures. You can add additional scanners manually here, or in the Malware Protection section of the main Console. |
For more information about supported scanners and other requirements, see “Scanning Overview”.
On this window of the configuration wizard, you can configure logging of WebMarshal sessions and actions to a SQL database. Database logging is required if you want to report on WebMarshal activity using the Marshal Reporting Console application.
Database logging is not enabled by default. You can enable logging on this window, or later using the Database Logging window in the Console Global Settings.
Figure 13: Configuration Wizard, Reporting Database window
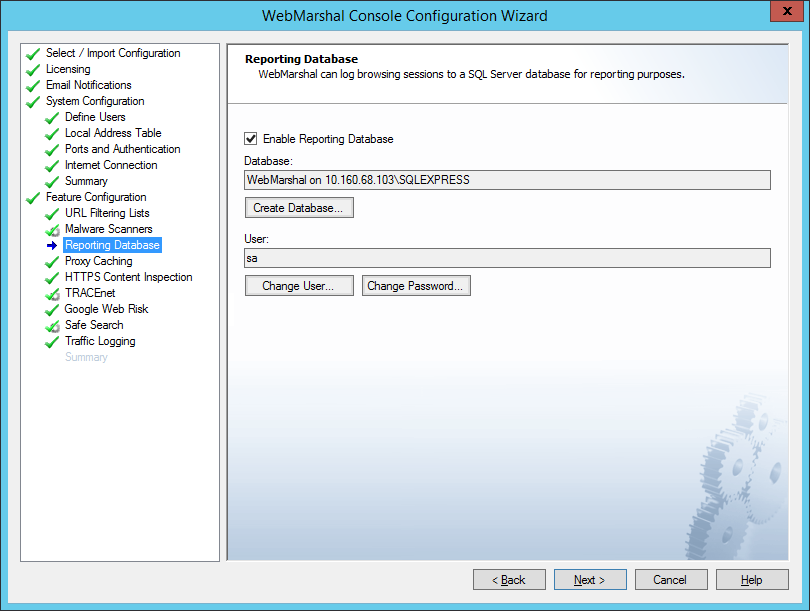
To use database logging:
1.Select Enable Database Logging. The Create Database window opens.

2.On the Create Database window, enter the name of the SQL Server computer and instance in the SQL Server Name field. You can browse the network if necessary.
|
Note: If you installed SQL Express on the Array Manager from the WebMarshal installer with the default options, you can enter localhost\SQLEXPRESS. If you installed SQL Express on the Array Manager using the Marshal Reporting Console installer, you can enter localhost\MRC_SQLEXPRESS. |
3.Enter the name of the new or existing database you want to use.
4.Enter a Windows or SQL user name with database creation privileges on the SQL server.
5.Enter the password for the user name.
6.You can connect to the database using TCP/IP by checking the box Connect using TCP/IP Protocol. You might need to use this option if the SQL Server connection is through a firewall.
7.If the database you selected already exists, you can choose to recreate it. Be sure that the existing database is not needed.
8.Click OK to create the database.
After you have created the database, you can configure a user with the minimum rights required by WebMarshal (known as the “operational user.” To start this process, click Change User. For details of this process, see Help for the Change Operational User window.
You can also change the password associated with the database user on the server. To start this process, click Change Password. For details of this process, see Help.
On this window, you can choose to enable or disable WebMarshal proxy caching. This feature is enabled by default. Caching retains local copies of items downloaded from the Web via HTTP or HTTPS, where appropriate. When WebMarshal later responds to a request for the same items, they are returned from the local copy, saving time and bandwidth.
|
Note: Proxy caching applies for HTTP and HTTPS requests by default (never for FTP). You can disable caching of content delivered over HTTPS, For more information see Trustwave Knowledge Base article Q21204. •WebMarshal bandwidth reports treat cached requests as any other request. To see details of cache activity and bandwidth savings, use the Real-Time Dashboard in the Console. •To log cache activity in detail, use WebMarshal Traffic Logging. •You can choose to include or exclude cached content from volume Quotas. See “Configuring Access Using Quotas”. |
Figure 14: Configuration Wizard, Proxy Cache window
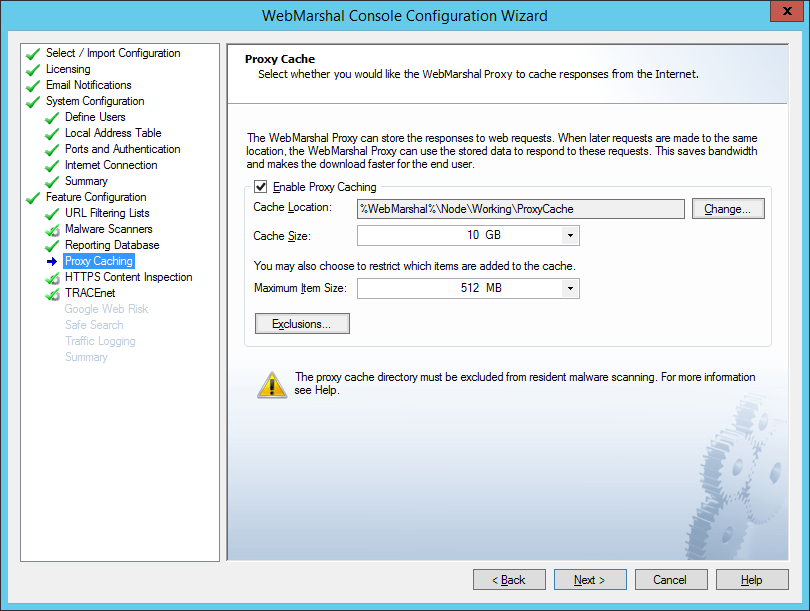
To enable caching, check the box. Then review the additional options. The default settings are reasonable for a trial installation. When setting up a production installation you should carefully consider the values.
For more information about the options, see “Configuring Proxy Caching”.
For information about the fields on this window, see Help.
3.2.15 HTTPS Content Inspection
This window allows you to perform basic setup required to use HTTPS Content Inspection in WebMarshal. You can generate a HTTPS Root Certificate and enable the HTTPS Content Inspection functionality.
HTTPS Content Inspection allows WebMarshal to perform the full range of content filtering on HTTPS (secure) web requests.
This feature is disabled by default. Before enabling HTTPS inspection in a production environment, you should review the legal implications of the feature, and notify users. For more information about the issues, see “Configuring HTTPS Content Inspection”.
For information about the fields on this window, see Help.
On this window, you can choose to enable or disable WebMarshal TRACEnet filtering. TRACEnet is a “zero day” protection framework supported by the Trustwave Security Labs team. TRACEnet identifies malicious URLs and allows you to block access to these sites. The Security Labs team provides frequent updates to the listed URLs, based on data from a number of sources. This framework gives protection against “blended” threats and new risks.
When TRACEnet is enabled, it receives updated URL information from Trustwave. The TRACEnet digest collator reports summary data about blocked threats to Trustwave over a secure Web connection. The Security Labs team uses the reported data as part of the threat identification process that feeds back in to TRACEnet updates.
TRACEnet service is included for WebMarshal customers holding current maintenance contracts, as well as for product trials. The maintenance expiration for TRACEnet displays on the TRACEnet page. This information is provided by the TRACEnet update server.
|
Note: TRACEnet updates require a working Internet connection from each WebMarshal processing node. |
On this window, you can choose to enable or disable WebMarshal Google Web Risk integration. Google Web Risk is a Google service that lets client applications check URLs against Google's constantly updated lists of unsafe web resources.
To enable Google Web Risk, you must enter a Google API key. For more information see Trustwave Knowledge Base article Q21059.
When Google Web Risk is enabled, WebMarshal retrieves URL listings from Google. WebMarshal validates individual URLs based on the locally cached information, or if necessary by an individual query to the Google servers.
On this window, you can choose to enable or disable the Safe Search enforcement feature of WebMarshal. This feature is enabled by default.
This feature allows you to enforce use of the “Strict Safe Search” function that some search engines provide. At this release, WebMarshal Safe Search supports Google, Yahoo!, and Bing safe search, as well as YouTube Safety Mode. When this feature is enabled, WebMarshal adds the “safe search” parameter to each request that a user makes to the supported search engines.
|
Note: The search filtering provided when WebMarshal Safe Search is enabled depends entirely on the results returned by the specific search engine, and is not based on any further evaluation by WebMarshal. The search engines do not guarantee that they can filter out 100% of the offensive or adult material returned by a search. The content excluded from the search results through WebMarshal is in line with the search engine providers’ policy. See the search provider websites for more details. |
On this window, you can configure logging of WebMarshal sessions and actions to text files in W3C or WELF format. You can use these logs to further analyze WebMarshal activity using external tools.
Figure 15: Configuration Wizard, Traffic Logging window
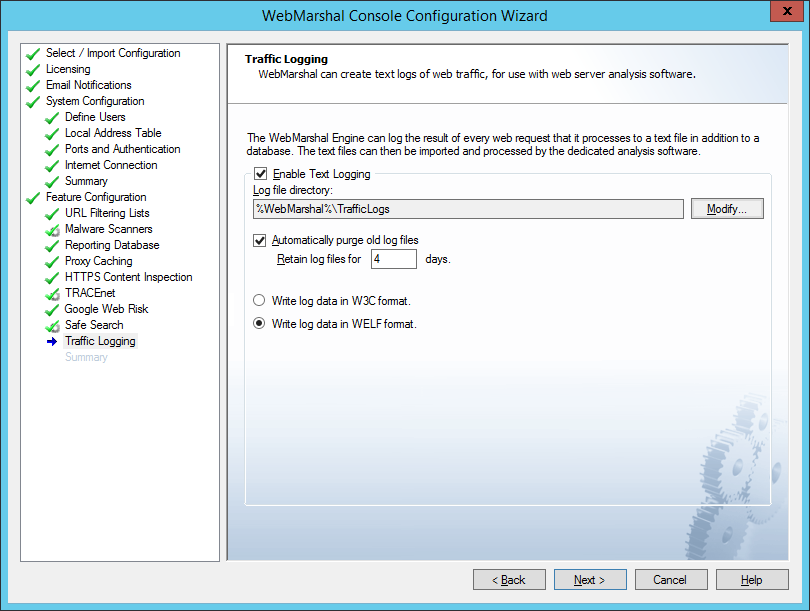
Traffic logging is not enabled by default. You can enable logging later using the Global Settings section of the Console.
To use text logging, select Enable Text Logging.
For a production installation, you should review the file location and choose a retention policy.
For details of the fields on this window, see Help.
3.2.20 Feature Configuration Summary
On this window you can review the system configuration settings that have been automatically detected or manually configured. Each section of the window summarizes the information entered on one of the previous windows of the Wizard. To see more details or edit the information, click Edit for the section. Click Finish to start WebMarshal services and run the WebMarshal Console.
3.2.21 Additional Configuration Steps
When installed, WebMarshal immediately begins accepting and filtering Web requests.
The default and auto-detected settings are designed to ensure that users in a test environment will have basic browsing privileges.
Before you put WebMarshal into production, you should complete some additional steps. Use the Console to complete these steps:
1.Verify user information: Since WebMarshal is an authenticating proxy server, each browser session must supply a logon credential before any browsing is permitted. Check the status of connectors, imported groups, and IP range groups. Adjust settings as required. See “Users and Groups”.
2.Customize Rules: If you have chosen to use the WebMarshal default Rules, every authenticated user will have basic browsing privileges. To adjust permissions quickly, you can add Users to additional WebMarshal Groups. You can enable and edit Rules as required using the Console. See Chapter 6, “Understanding Web Access Policy, Rule Containers, and Rules.”
3.Configure Malware Protection (optional, but strongly recommended): If you plan to use Virus Scanners with WebMarshal, verify that the software is installed and initial signatures are downloaded, then enable Malware Scanning Rules. See “Using Malware Scanning”.
4.Configure Filtering Lists (optional): If you plan to use URL filtering lists with WebMarshal, you must enable them and ensure that the initial database downloads are complete before you enable them in any rules. See “Configuring URL Filtering Lists”.
5.Configure browser proxy settings to use WebMarshal: To use WebMarshal, in most cases web browsers must be configured with proxy settings. See “Configuring Web Browsers”.

