7.7 Using Malware Scanning
WebMarshal can invoke third-party scanners to check file uploads and downloads for malware, including viruses and other malware. Before you enable scanning Rules, you must install at least one supported scanner on each processing server, and configure the scanners within WebMarshal.
7.7.1 Scanning Overview
WebMarshal currently supports only specific malware scanners that have licensed DLL interfaces. Supported scanners include Bitdefender for Marshal, McAfee for Marshal, and Sophos for Marshal.

|
Note: The Sophos (SAVI interface) and Symantec scanners that were previously supported are not supported in this release, as the required 64-bit integration is not currently available. These scanners may be available in a future release depending on the availability of the third party integration.
Kaspersky for Marshal is no longer sold.
|
You choose which files to scan using Malware Scanning Rules. See Chapter 6, “Understanding Web Access Policy, Rule Containers, and Rules.”
For enhanced protection against viruses and malware, TextCensor and file type rules should also be used to control potentially dangerous file types such as VB Script and executable files.
|
Note: WebMarshal uses a temporary directory during scanning. This directory must be excluded from on-access or resident virus scanning. If it is not excluded, the WebMarshal Engine and/or the WebMarshal Controller service may be unable to start. By default, WebMarshal uses the \temp subdirectory of your install directory. You can change this location by editing XML configuration files on each processing server and restarting the WebMarshal services. If you change the location of the temporary directory for either or both services, be sure that you also update virus scanner exclusions.
|
To view and add to the list of configured scanners, select Malware Protection from the left pane of the WebMarshal Console.
7.7.2 Adding a Scanner
To add a malware scanner to the list of configured scanners:
1.Select Malware Protection from the left pane of the WebMarshal Console.
2.Click the New Malware Scanner icon  in the tool bar to start the New Virus Scanner Wizard.
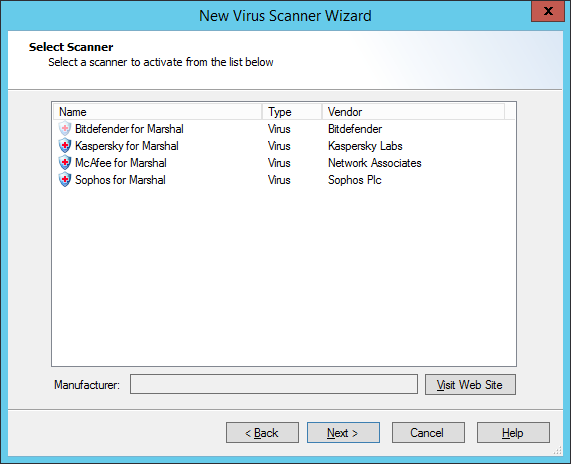
3.The Select Scanner page of this Wizard shows a list of scanners WebMarshal can use.
To obtain more information about any scanner, select it and then click Visit Website.
4.Select a scanner to add.
All scanners that you add will be available for use by WebMarshal. When you create a malware scanning rule, you can choose the scanners that rule will use. You can use multiple scanners in a single rule or separate rules. Because different products have differing coverage, some sites choose to use more than one scanner.
5.Click Next to continue to the next page.
6.If any additional parameters are required, the additional parameters pages of the wizard is shown. Enter any required parameters (such as the location of a scanner if it is installed remotely). Click Next to continue to the next page.
7.Click Finish to install the scanner and exit the Wizard.
To select an additional scanner for use, re-run the Wizard.
|
Note: Bitdefender for Marshal, McAfee for Marshal, and Sophos for Marshal each require installation of a configuration Console, available in separate downloads from Trustwave (and licensed separately).
You must install this software on the WebMarshal server. If you have configured an array of servers, you must install the scanning software on each processing server.
WebMarshal trial keys enable all of these products for the 30 day trial period. To obtain a permanent key, contact your Trustwave supplier. If you are a customer with a permanent WebMarshal key and you want to try one of these scanner products, contact your Trustwave supplier for a special time-limited key.
|
7.7.3 Deleting a Scanner
To delete a configured scanner from the list of scanners WebMarshal can use:
1.Select it in the right pane of the Console
2.Click the Delete icon in the taskpad tool bar.
|
Note: If any malware scanning rule is enabled, you cannot delete all scanners of the type(s) used by that rule.
•If any malware scanning rule (including disabled rules) references a specific scanner, you cannot delete that scanner.
•Deleting a scanner from the list does not uninstall the scanning software.
|
7.7.4 Testing Scanners
To test the operation of an installed malware scanner:
1.Select it in the right pane of the Console
2.Click the Properties icon in the taskpad toolbar.
3.Select the Installation Status tab. WebMarshal queries each processing server and returns the status of the scanner on each server.