|
Note: Connectors, previously covered in detail here, are now covered under Global Settings. See “Configuring Connectors”. You can choose to create a new connector any time you import a User Group. |
The User Management functions allow you to import and organize user account information. This information is used to control and record browsing access.
|
Note: Connectors, previously covered in detail here, are now covered under Global Settings. See “Configuring Connectors”. You can choose to create a new connector any time you import a User Group. |
Select this element to view a complete list of user names in all groups that have been imported into WebMarshal. This list is empty until at least one group has been imported (or, in the case of IP range entries, a computer in the range has browsed through WebMarshal).
To view additional details about a user, double-click to open the User Properties window.
•The General tab shows the name, description, source, and full distinguished name information for a user. You can edit the description.
•The Rules tab shows all rules that apply to this user. Highlight a rule and click Jump to Rule to view the details of that rule.
•The User Groups tab shows all user groups that this user belongs to. Highlight a group and click Jump to User Group to view the details of that group.
•The Quotas tab shows a list of quotas that apply to the user. To extend a quota for the user, click Extend Quotas. For more information about extending quotas, see “Editing a Quota”.
WebMarshal supports five types of User Groups. Each displays in the Console with a unique icon.
•WebMarshal groups  (user folder).
•Windows NT user groups  (green shirts).
|
Note: WebMarshal supports both Global and Local NT user groups. •Global user groups are created on a Windows Domain Controller or Active Directory server. •Local user groups are created on domain controllers or standard workstations, and can contain users from any domain. They can also contain global user groups. Local user groups cannot contain other local groups. |
•Active Directory user groups  (blue shirts).
•Novell NDS user groups  (red shirts).
•IP address range groups  (users with workstation).
Typically, WebMarshal groups include users that have similar Web access requirements. WebMarshal groups can include other groups, single users, and computer groups. The default configuration that you can import when you install WebMarshal includes several user groups. To quickly enable the default policy, you can import groups from connectors, or create computer groups, and then insert these new groups into the default WebMarshal groups.
To view the list of users and groups contained in a group, select that group in the left pane menu tree.
Figure 22: WebMarshal Console, User Groups window
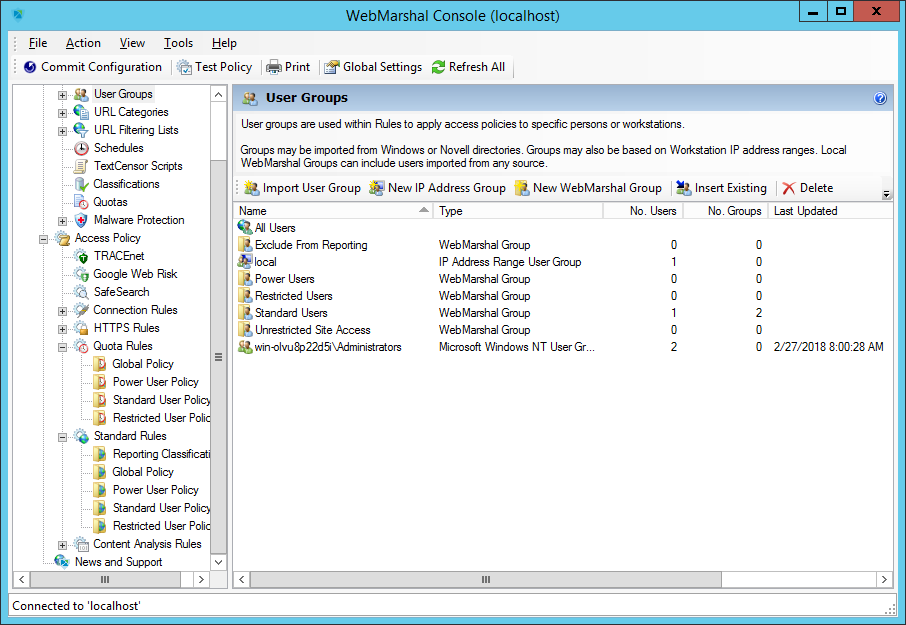
To edit the group description, and/or to reload the group (for Windows and NDS directory groups), right-click the group and click Properties.
For network security, groups imported through connectors are read-only and cannot be edited using the WebMarshal Console. These groups are synchronized with the parent directory on the schedule you specify in the Connector properties for the appropriate directory type (by default, once a day).
1.In the WebMarshal Console, expand User Groups or a specific group.
2.From the Action menu or the right pane menu bar, choose one of the following actions:
•Import User Group
•New IP Address Group
•New WebMarshal Group
3.Import User Group(s) from a Connector: On the Import User Groups window, find and select the names of the groups you want to import into WebMarshal. You can use imported groups, and individual users, in WebMarshal user groups or rules.
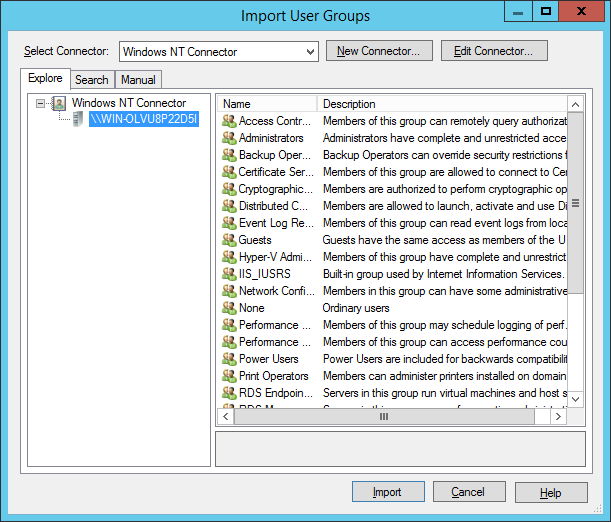
You can explore or search for groups. You can also enter group names manually.
For NT groups, names you type must be in domain\usergroup format. Enter multiple names separated by semi-colons. For Active Directory and NDS, names you type must be fully distinguished names.
|
Tip: WebMarshal can import groups from trusted Active Directory domains, subdomains, and other domains that have an explicit two way trust relationship with the domain that WebMarshal is a member of. For additional details see Trustwave Knowledge Base article Q11870. |
4.Click Import to add the User Group.
5.New IP Address Range Group: Enter a name and optionally a description.
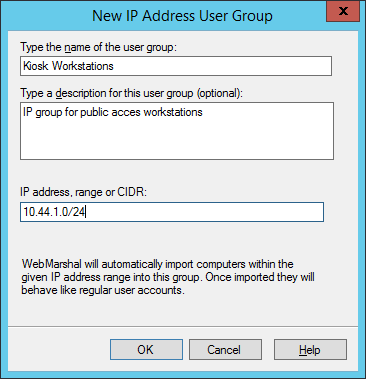
Enter an IP address, a range (starting and ending addresses separated by -) or a CIDR specification. Any user or process on a computer with an IP address in the specified range can browse through WebMarshal, subject to any Rules applied to the group.
|
Note: A range can be in the IPv4 or IPv6 address space. WebMarshal adds the name or IP address of each computer in this range to the All Users list the first time that computer connects to WebMarshal. Once the computer names are included in the list, you can use them individually within Rules in the same way as any other User. If you want to add a specific computer to a WebMarshal User Group explicitly (when it is not included in All Users), see “Adding computers or IP addresses to a Group”. |
IP authentication works much better if DNS is configured to support reverse DNS lookups. Reverse DNS allows WebMarshal to get a name for an IP address. If that returned name matches the NetBIOS name, WebMarshal can query the computer for its description. (As a consequence, you cannot specify different permissions for the IPv4 and IPv6 interfaces of the same computer.)
6.New WebMarshal Group: Enter a name and optionally a description. This type of group is internal to WebMarshal. You can use WebMarshal groups to quickly apply policy to multiple groups and users.
7.1.1.5 Inserting existing groups to a WebMarshal Group
1.In the WebMarshal Console, expand a specific group within User Groups.
2.Click the Insert Existing icon ![]() in the tool bar. If no users or imported groups are present, you have the option to import or create User Groups (see the procedure above)
in the tool bar. If no users or imported groups are present, you have the option to import or create User Groups (see the procedure above)
.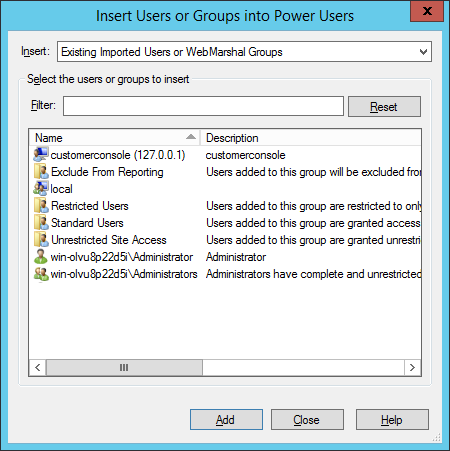
3.Within the Insert Users or Groups window, select Existing Imported Users or WebMarshal Groups. Select one or more users or groups with the mouse, or type the beginning of a name to select it.
4.Use the Enter key or click Add to add the selected items into the Group.
WebMarshal also supports “drag and drop” for inclusion of members in a group. To use this feature, drag a group or user name or names (from either pane) over a group name in the left pane. Hold down the Ctrl key while dragging to copy the group or user name; otherwise it will be moved.
7.1.1.6 Adding computers or IP addresses to a Group
1.In the WebMarshal Console, expand a specific group within User Groups.
2.Click the Insert Existing icon ![]() in the tool bar.
in the tool bar.
3.Select New Computer Accounts by IP Address or New Computer Accounts by Computer Name. In the text box, enter computer names, or IP addresses, one per line. You can only add valid computer names from the local network. IP addresses are resolved to computer names if possible. You can add any well-formed IPv4 or IPv6 address.
|
Note: WebMarshal attempts to resolve IP addresses to NetBIOS names. NetBIOS names are used to allow for dynamic allocation of IP addresses. You can enter fully-qualified domain names, but they might be rejected due to IP address duplication. |
7.1.1.7 Changing user group properties
The User Group Properties window shows the source and reload status of a User Group. Use this window to:
•Edit the group description for WebMarshal and IP groups.
•Change the range of IP addresses included in an IP address group.
You can also click Reload Now to update the group membership, provided the group has an external source (Windows NT or NDS directory). Reload also updates the Status information with the result of the reload operation. To schedule automatic reloading of the group, edit the Connector properties.

