7.5 Configuring Access Using Quotas
Quotas allow you to limit users’ browsing activity by time or by volume (total bandwidth).
You can set different Quotas for different user groups. More than one Quota can apply to a user.
Different limits can apply at different times. For instance, the organization may wish to limit access to news sites during working hours but allow unlimited access after hours.
Quotas are applied as Rule conditions. To list the rules that use a quota, and the quota usage for each user, view the properties of the quota.
1.Select Quotas in the left pane.
2.Click the New Quota icon ![]() in the tool bar to start the New Quota wizard.
in the tool bar to start the New Quota wizard.
3.On the Quota Interval page of the wizard, select the allocation interval. Click Next to continue.
|
Note: Quotas are reset at midnight (local time at the WebMarshal processing server) at the beginning of the first day of the quota period. |
4.On the Quota Type page of the wizard, choose whether this will be a time or volume (bandwidth) quota.
5.For a time quota, choose the amount and period (minutes or hours).
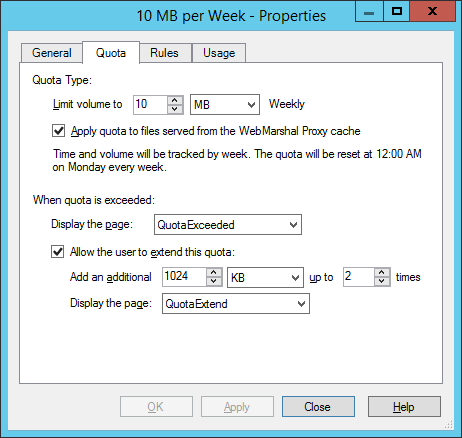
6.For a volume quota, choose the number and unit (Kilobytes, Megabytes, or Gigabytes). Choose whether to apply the quota to pages served from the WebMarshal Proxy Cache.
7.Click Next to continue.
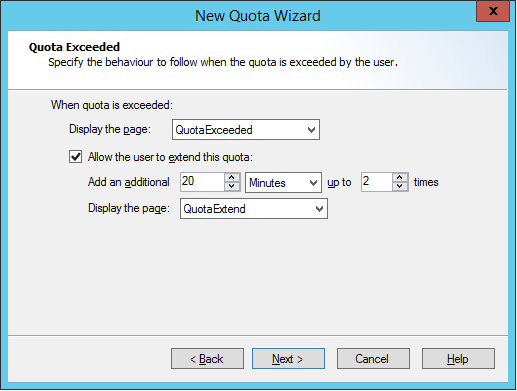
8.On the Quota Exceeded page of the wizard, select the actions WebMarshal will take when a user (or workstation) has exceeded the allowed quota.
a.Select a web page to display from the list. (To learn how to add items to this list, see “Notifying Users with Notification Pages”.)
b.To allow users to extend the quota, check the box and enter the required information:
•Amount of time or volume to be added per extension.
•Number of extensions allowed.
•Web page to display.
9.Click Next to continue.
10.On the Quota Name page, enter identifying information.
•Enter a name for this Quota (required).
•Optionally enter a description indicating the intended use of the Quota.
11.Click Next to continue.
12.On the Completing page of the wizard, click Finish to save the Quota, or Cancel to exit without saving.
You can change the global properties of a quota. You can also extend a user’s allocation for the current quota period.
1.Select Quotas in the left pane.
2.Double-click an existing Quota name in the right pane to edit it.
3.On the General tab, edit the name and optional description of the Quota.
4.On the Quota tab, edit the properties of the Quota.
5.On the Rules tab, you can see a list of rules that apply to this quota. Highlight a rule and click Jump to Rule to view the details of that rule.
6.On the Usage tab, you can see the quota usage for a selectable period for each user affected by the quota.
|
Note: This display does not reflect Quota amounts used in current Active Sessions. The usage information is updated at the end of a browsing session. |
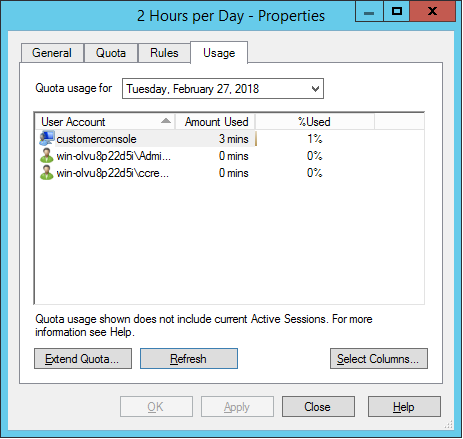
7.To extend the quota for a specific user, select that user from the list then click Extend Quota to open the Extend Quota window.
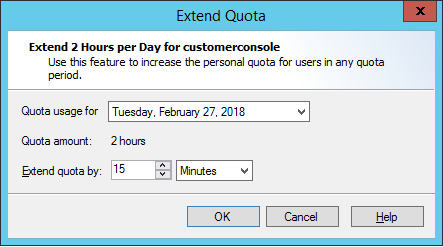
•The window shows the user’s default allocation. Enter the desired extension as a number of minutes, hours, KB, MB, or GB. Click OK to apply the change and return to the Quota Properties window.
|
Note: Changes made here only affect the selected quota period (day or week). Changes made here do not affect the user's ability to extend the quota (as set in the Quota properties). |
•To refresh the display, click Refresh.
|
Note: You can allow a user to extend their own quota when they reach the limit. See “Quota Extensions”. |
8.Click OK to save the changes to the Quota, or Cancel to lose any changes.
To duplicate a Quota:
1.Right-click its name in the right pane.
2.Select Duplicate.
To delete a Quota:
1.Right-click its name in the right pane.
2.Select Delete.
If WebMarshal Quotas are in use, users can check their quota allocation and usage from the WebMarshal website.
The URL of the quota page is http://webmarshal.home/Quotas
This URL can only be accessed from inside the local network for which WebMarshal is the gateway. The browser must be configured to use WebMarshal as a proxy server.
This page shows the user name of the authenticated session.
Figure 24: WebMarshal User Quota page
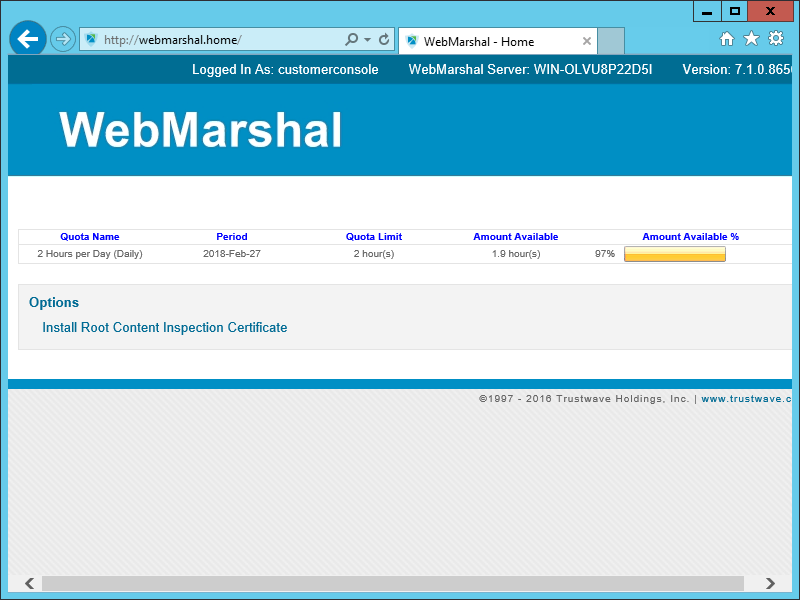
Each quota for that user is displayed. The quota limit (including extensions used if any), amount remaining, and percentage remaining are shown.
If a user makes a Web request (page view, upload, or download) which would exceed their remaining quota, they will be notified by a web page.
If the quota is configured to allow user extensions, and the user has not yet used all allowed extensions, the notification web page will include a button to extend the quota.
When the user clicks the button Request a quota extension, the extension is recorded and the request is processed.
The WebMarshal Administrator can monitor and extend quotas for all users from the Usage tab of the Quota Properties window (see “Editing a Schedule”).
7.5.7 Quota and Browsing Time Calculation
WebMarshal calculates user browsing time for Quotas and to log usage for reporting, based on a session timeout value and a padding time. For information about how to set these values, see “Viewing Product Information”. For additional details see Trustwave Knowledge Base article Q11755.
•Each time a page is requested, WebMarshal checks for a previous request from the same user.
•If the previous request from the user was within the session timeout value, the WebMarshal logs show a continuous period of browsing.
•If the previous request was longer ago than the session timeout value, the WebMarshal logs show that browsing activity stopped after the previous request plus padding time, and started again with the new request.
