|
Note: Licensing information, previously located in Server and Array Properties, is now accessed from the Tools menu of the main Console window. See “Managing Licensing Information”. |
9.1 Configuring Global Settings
The Global Settings window (previously known as Server and Array Properties) allows the administrator to modify settings that affect server operation for the entire installation. These are divided into a number of categories.
|
Note: Licensing information, previously located in Server and Array Properties, is now accessed from the Tools menu of the main Console window. See “Managing Licensing Information”. |
These items are related to administration of the installation.
•General: View information about the WebMarshal version and the latest committed configuration; set session timeouts.
•Email Notifications: Set up sending of WebMarshal automated email.
•Configuration Backup: Configure backup of the WebMarshal configuration on a nightly basis, or after every committed change.
•Remote Console: Configure access to a web-accessible WebMarshal Console.
•Reporting Database: Set up activity logging in the SQL database.
•Traffic Logging: Set up activity logging in text files.
•Customer Feedback: Anonymously send browsing history through WebMarshal back to Trustwave to improve product quality and functionality.
•Security Permissions: Run the WebMarshal Security Tool to configure console access.
These items affect client connections to the WebMarshal processing nodes, and connections from WebMarshal to the Internet. Some of these settings can be customized for each Server Group.
•Proxy Caching: Activate and configure the Proxy Cache feature
•Local Address Table: Edit the list of IP addresses allowed to make client connections.
•Ports and Authentication: Edit the list of ports WebMarshal uses for client connections, and the authentication methods accepted.
•Download Options: Configure thresholds for scanning-related delays.
•Internet Connection: Set the method used by WebMarshal to retrieve requested items from the Internet.
•Proxy Bypass List: Configure a list of sites that are excluded from all WebMarshal processing.
This item affects unpacking of files by the WebMarshal Engine.
•Unpacking: Configure a list of URL Categories that might be the source of large files that should not be unpacked and scanned.
These items affect elements used in Rules.
•Connectors: Configure directory services used to import users into WebMarshal.
•HTTPS Content Inspection: Create the Certificate required for HTTPS inspection, and enable or disable this feature.
•Filtering List Schedule: Configure update schedules for URL lists.
•Connection Rules: Enable or disable processing of this type of rule.
•General: Configure logging level for WebMarshal services and other minor items.
•HTTPS Connection Restrictions: Configure settings that affect access for non-browser HTTPS applications.
To access the Global Settings window, select Tools > Global Settings. In most cases changes in this information require you to commit the configuration.
|
Note: You can also customize some settings for each Server Group in the WebMarshal installation. For more information, see “Configuring Server Group Properties”. |
9.1.6 Viewing Product Information
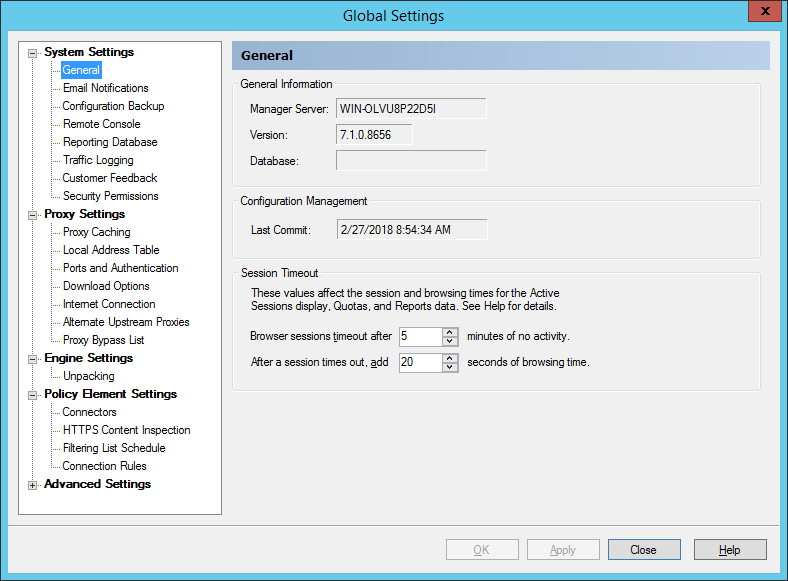
The General window displays information about the Array Manager server, the product version installed, the time that configuration was last committed, and the session timeout values.
Figure 25: WebMarshal Properties, General window
You can commit and revert configuration changes from the Console Action menu. You can back up and restore configuration from the Console File menu. See “Configuring Configuration Backup” and “Working with Configuration”.
WebMarshal uses these value to calculate browsing time, time-based quota usage, session length, and visit length for Active Sessions and reporting.
•Browser sessions time out after: A session (and also a domain visit) is assumed to have ended if no new request is received within the time specified. The default is 5 minutes. Users who must enter a login to browse will have to re-enter it after this time.
•After a session times out, add browsing time: A user is assumed to be reading a page for some time after the last request. Enter the number of seconds.
For more details about these values and calculations, see Trustwave Knowledge Base article Q11755.
9.1.7 Configuring Email Settings for Notifications
The Email Notifications window allows you to configure the address and email server WebMarshal will use when sending email notifications to the administrator. These notifications include critical system problems, and alerts based on rule triggering.
Figure 26: WebMarshal Properties, Email Notifications window

To configure notifications:
1.In the mail addresses field, enter the administrator’s SMTP e-mail address. WebMarshal sends administrative e-mail notifications to this address. You can enter multiple addresses, separated by semi-colons. For example:
postmaster@example.com;itsupport@example.com
2.In the From field enter the email address that will be used to send messages.
3.In the Server Name field to enter the IP address or name of an e-mail server that will accept the e-mail message for delivery to the administrator. This server must be accessible on the network from the WebMarshal server, and it must accept e-mail from the WebMarshal server for delivery to the administrator’s address.
4.In the Server Port field, enter the port number used by the SMTP server to accept connections. The SMTP default is port 25.
Click Test Settings to send a test e-mail to the administrator address. The test is successful if a message is delivered. If WebMarshal encounters a connection error, a notification displays at the Console.
9.1.8 Configuring Configuration Backup
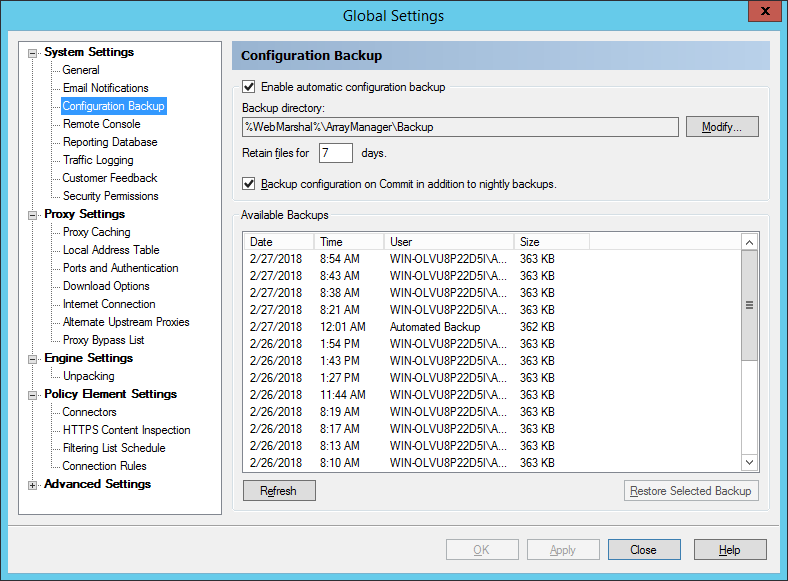
The Configuration Backup window allows you to configure WebMarshal to automatically back up the configuration. The backup occurs each night after 12 o’clock if the WebMarshal Array Manager service is running. If the service is not running the Automatic Configuration backup will be created when the service becomes available again. The backup files created include the committed configuration, and not any changes made in the Console but not yet committed.
For additional information about backing up and restoring configuration, see “Importing and Exporting Configuration”.
You can also choose to back up configuration every time configuration is committed.
Figure 27: WebMarshal Properties, Configuration Backup window
To configure Backup:
1.Check the Enable automatic configuration backup box.
2.By default the files are stored within the WebMarshal install directory. Optionally select a location for the backup files. This can be a local or network location. For details, see Help and Trustwave Knowledge Base article Q12959.
3.Enter the number of days to keep the backup files. The default is 7 days.
The Available Backups section lists the available backups. To restore a configuration from a backup, select it from the list and then click Restore Selected Backup. To refresh the list of Backups click Refresh.
9.1.9 Configuring Remote Console Access
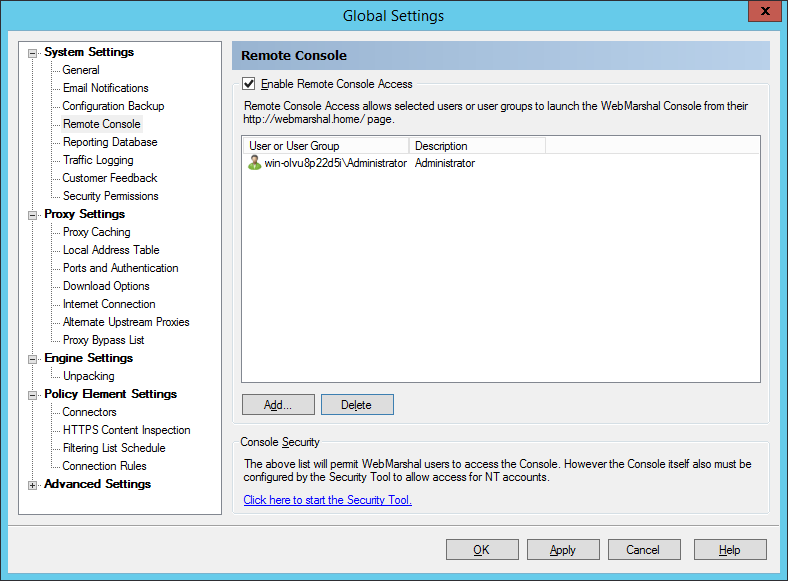
The Remote Console window allows you to configure access to the WebMarshal Console from any location that can access the WebMarshal proxy as a client (addresses in the Local Address Table). Users can start the Console from a link on the WebMarshal Home page. Remote Console access uses the Microsoft “Click Once” functionality to install a temporary copy of the Console.
Figure 28: WebMarshal Properties, Remote Console window
To enable Remote Console:
1.Select Enable Remote Console Access.
2.Edit the list of users and groups that are permitted access. These users will see a link to the Console on their WebMarshal Home page.
3.Use the WebMarshal Security Tool to configure access to the Console and individual Console features for specific Windows accounts. By default, members of the Administrators group on the Array Manager server have full access.
For more information about the Remote Console feature and configuration, see Help.
|
Note: .NET 4.6.2 must be installed on the client workstation. For more tips about client requirements, see Trustwave Knowledge Base article Q13709. |
9.1.10 Configuring the Reporting Database
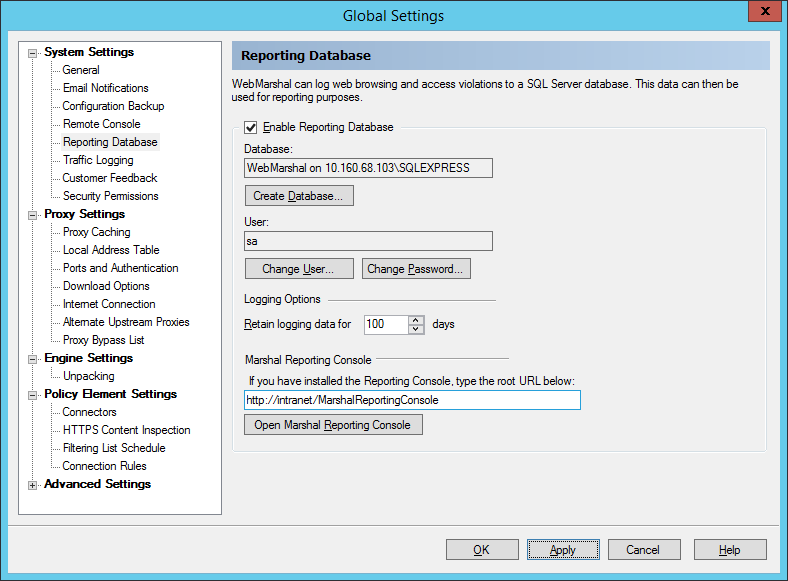
The Reporting Database window allows you to view and change the location of the optional WebMarshal reporting database, as well as data retention settings. You can also enter the URL of the Marshal Reporting Console, if installed.
Figure 29: WebMarshal Properties, Reporting Database window
To enable logging:
1.Check the box Enable Reporting Database.
2.If you had previously enabled logging, the existing database name is displayed in the Database field. Click Create Database to create or select a database. For details of the Create Database window, see Help.
3.To use the database for logging and reporting, you can create a database user with limited rights. To start this process, click Change User. For details, see Help.
4.To change the password of the database user account, click Change Password.
To set data retention:
•Retain logging data: Logs are only available for reporting for the number of days you specify in this field. Most organizations choose to retain logs for at least a month to give a reasonable interval for reporting. The default is 100 days.
To configure the Marshal Reporting Console link:
•Marshal Reporting Console: Enter the URL of your Marshal Reporting Console installation. Entering a URL enables context menu links on the Active Sessions, User Groups, and Users lists, as well as the Open Marshal Reporting Console button on this page.
9.1.11 Configuring Traffic Logging
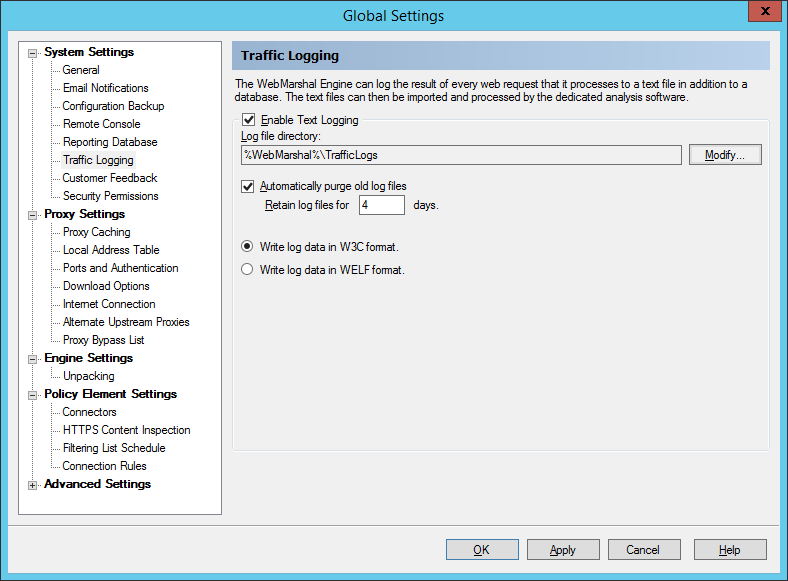
The Traffic Logging window allows you to configure logging of Web requests to text files, for processing by external analysis software. WebMarshal supports both W3C and WebTrends Extended Logging Format (WELF). Text logs primarily include information about each file request, and the rule that blocked the request if any.
Figure 30: WebMarshal Properties, Traffic Logging window
To configure traffic logging:
1.Check the box Enable Text Logging.
2.By default, log files are created in the subfolder TrafficLogs within the WebMarshal install folder on each WebMarshal processing server. If you want to change the location, click Modify, enter the location in the Modify Traffic Logging window, and then click OK.
|
Note: The location must be on a local device. Network locations and mapped drives are not supported. |
3.By default, log files are deleted after 4 days. To set a different policy for retention, clear the checkbox Automatically purge old log files, or change the value of the Retain log files field.
|
Note: Ensure that the disk location used for log files has sufficient free space to hold the files for the time you require. These files can grow large quickly. |
4.Select W3C or WELF format.
5.Click OK or Apply to apply the changes. These settings are applied immediately and do not require you to reload the configuration.
For more details of these settings, see Help.
9.1.12 Configuring Customer Feedback
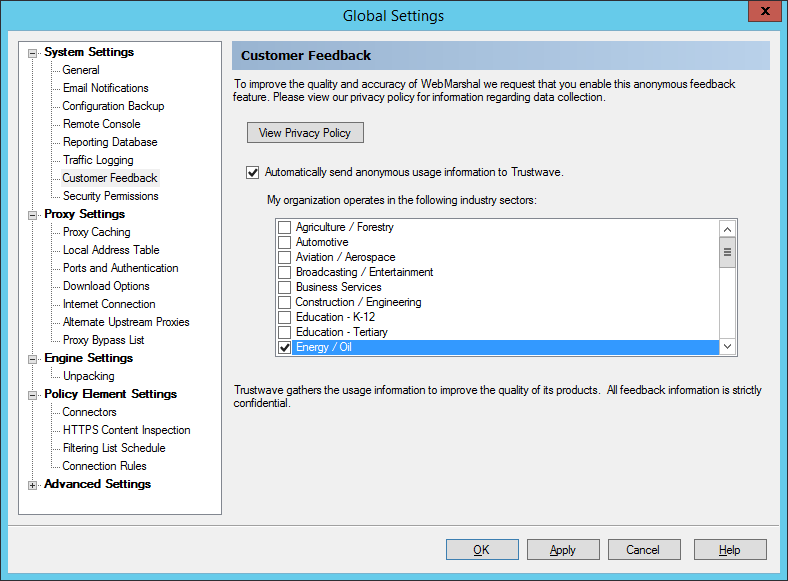
The Customer Feedback window allows you to configure WebMarshal to send anonymous summarized information about browsing history to Trustwave. Trustwave uses this data to improve product quality and functionality. You can view additional information about this function by clicking the View Privacy Policy button.
Figure 31: WebMarshal Properties, Customer Feedback window
To configure feedback:
1. Review the privacy policy by clicking View Privacy Policy.
2.To enable sending of feedback, check the box Automatically send... To disable sending of feedback at any time, clear the box.
3.Optionally select the industry sector(s) of your organization.
4.Click OK or Apply.
|
Note: When Customer Feedback is enabled, WebMarshal summarizes browsing information and sends it to Trustwave over HTTPS. Feedback is sent once a day between 12am and 1am. Feedback could be sent more often (if the number of items exceeds 100,000). WebMarshal performance is generally not affected by this process. |
9.1.13 Configuring Proxy Caching
The Proxy Cache window allows you to configure the behavior of the WebMarshal Proxy Cache function. The Proxy Cache can save bandwidth and improve response time by storing regularly requested files locally. If a requested file is available in the cache WebMarshal serves the cached file and does not request a new copy.
Before you configure caching in a production environment, review Trustwave Knowledge Base article Q12720, Proxy Caching Recommendations.
To review statistics for the cache, see the Cache Statistics section of the Real-Time Dashboard.
Figure 32: WebMarshal Properties, Proxy Caching window
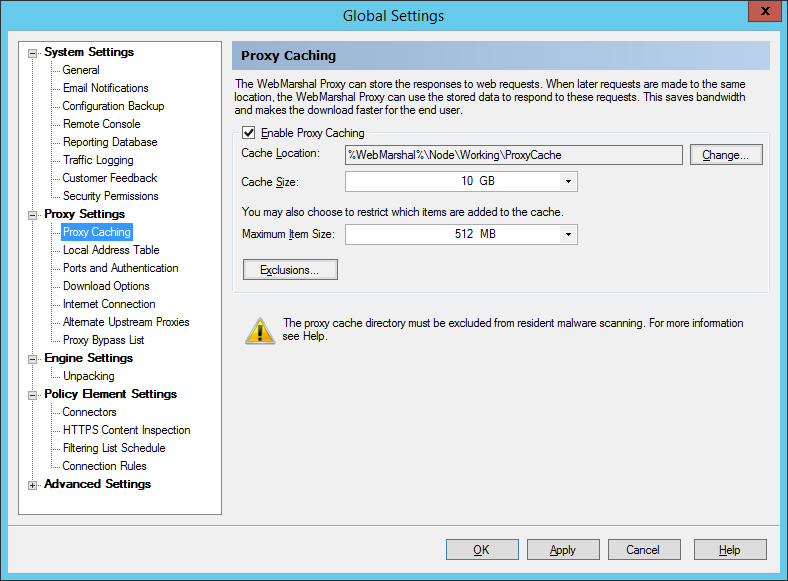
To enable caching, check the box. Then configure the following options:
1.Set the cache directory location. The default location is within the WebMarshal install. Most production installations should use a different location.
|
Note: If you change the location, any existing cache files are not moved automatically. You can move the files manually. Stop the WebMarshal Proxy service while moving files, and be sure to copy the cache.index file as well as content files. |
2.Set the maximum size of the cache. If you set up an array with more than one processing node server, the size applies to each server.
3.Set the maximum size of items that will be cached. You may want to limit the size if the available space for caching is limited.
Optionally click Exclusions to open a window that allows you to enter a list of URLs that should never be cached.
|
Note: Caching is available for HTTP and HTTPS requests only (never for FTP). You can disable caching of content delivered over HTTPS, For more information see Trustwave Knowledge Base article Q21204. •Some sites do not correctly implement content expiration. Applying caching for those sites can mean that users do not receive the latest content. You should only add a site to the exclusion list if you experience problems with caching for the specific site. For details of the allowed syntax for the exclusion list, see Help. |
9.1.14 Configuring the Local Address Table
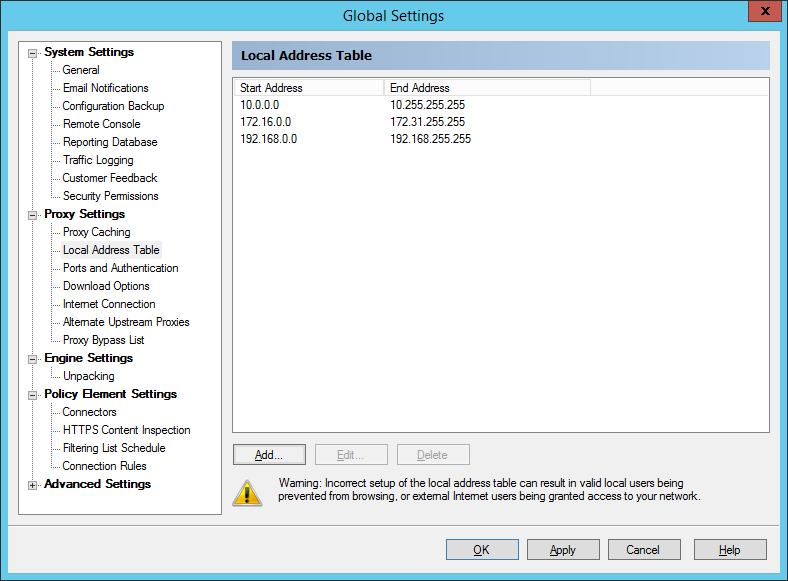
This window allows you to specify the range(s) of IPv4 and/or IPv6 addresses that are assigned to computers on your local network. By default, the LAT includes address ranges that are always reserved for local use, as well as any local ranges detected by WebMarshal auto-detection. If your local network uses different local IP addresses you can enter them.
|
Note: Only computers with addresses in the LAT ranges will be allowed to use the WebMarshal proxy. If a computer whose IP address is not in the LAT attempts to connect, the connection will be refused with an error message. |
Figure 33: WebMarshal Properties, Local Address Table window
To enter a new LAT range:
1.Click New.
2.Enter the starting and ending addresses in the range.
3.Click OK.
To edit an existing address range, select it and then click Edit. To delete an existing address range, select it and then click Delete.
9.1.15 Configuring Ports and Authentication
The Ports and Authentication window allows you to view and change the ports that WebMarshal uses to listen for client connections, and the authentication methods it accepts for each port.
|
Note: By default WebMarshal monitors each port on all available IPv4 and IPv6 Addresses. If the server has multiple interfaces, you can specify IP Address:port combinations (for example, 10.1.2.3:8085). You can also limit connections to IPv4 or IPv6 addresses only. |
Figure 34: WebMarshal Properties, Ports and Authentication window
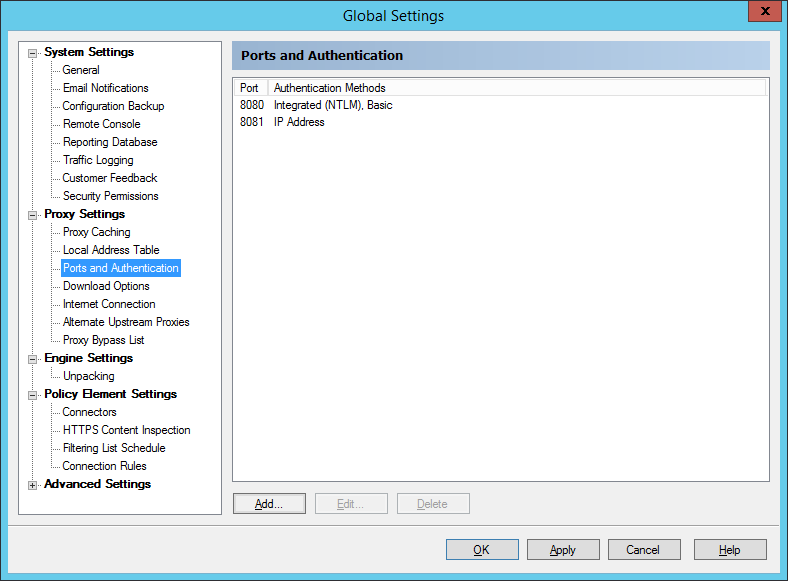
To add or edit listings, use the buttons below the list. For more information, see Help.
9.1.16 Configuring Download Options
The Download Options window allows you to configure the behavior of WebMarshal during Content Analysis scanning.
Figure 35: WebMarshal Properties, Download Options window
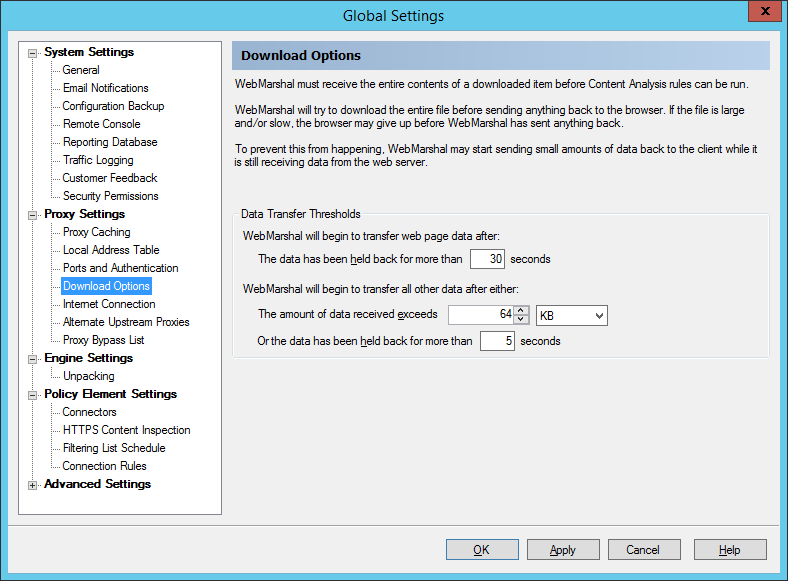
WebMarshal must receive the entire contents of a particular file before evaluating the Content Analysis rules. For large files or slow connections, this delay could affect the user’s experience. In some cases the browser software could abort the attempt.
To avoid these issues, WebMarshal can begin returning the file to the user before receiving the complete file. (WebMarshal only returns the final data from the file after scanning is complete.)
You can configure when data transfer will start.
|
Note: Because the partial text might be offensive or might violate policy, by default WebMarshal holds text data back as long as is practical while minimizing the chance that the web browser application will time out. •Binary data is returned in near real time. Full file scanning does not substantially increase total download times. •If a content analysis rule triggers to block a file after data transfer has started, the download to the user is aborted. WebMarshal presents a “file aborted” notice page to the user at the next opportunity. This is typically when the user next requests a web page. •In addition to the settings on this window, you can exclude safe file types or MIME types from scanning using rule conditions. Because WebMarshal now returns binary data in near real time and does not “trickle” a percentage of binary files, the “streaming content types” configuration used in previous versions is no longer required. You can still apply the “trickle transfer” and streaming content types settings if you wish. For more information about the change and optional configuration settings, see Trustwave Knowledge Base article Q12925. |
To configure Data Transfer Options:
1.Enter the minimum time WebMarshal will wait before starting to return text Web files.
2.Enter the minimum time WebMarshal will wait and the minimum amount of data WebMarshal must receive before starting to return non-text files.
|
Note: For non-text files, the transfer will start if either of these thresholds is reached. |
For more details of the settings, see Help.
9.1.17 Configuring Internet Connection
The Internet Connection window allows you to select the method WebMarshal will use to request material from the Web.
•Software updates (such as filtering list and TRACEnet updates) always use the method selected here.
•When WebMarshal is configured as a standalone proxy server (including chained installations), web requests from clients also use this method.
Figure 36: WebMarshal Properties, Internet Connection window
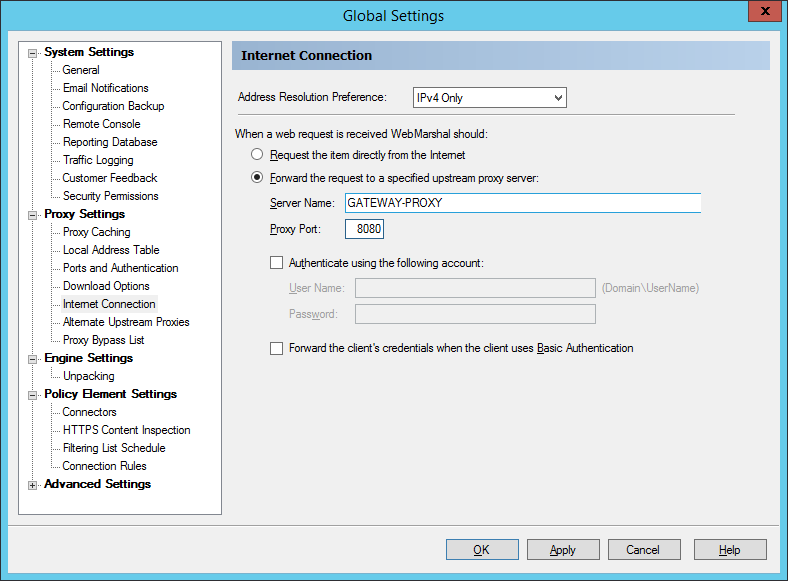
1.Choose the address resolution preference (IP protocol version to use when resolving outbound connections). This setting applies when WebMarshal resolves external websites or forward proxy names. IPv4 only is the default setting. For details of all options, see Help.
2.If WebMarshal can access the Web directly, select the Request the page directly option. This is the default setting.
3.If WebMarshal will pass requests on to another proxy server, select the Forward option and enter the required information.
For instance, if you want WebMarshal to pass requests to SquidNT running on the same computer, you can enter localhost as the computer name and 3128 as the proxy port (SquidNT listens on port 3128 by default).
4.Check the configuration of the other proxy server to ensure that it is using the port you have specified. If the other proxy server requires authentication, you can choose to enter a user name and password.
5.If WebMarshal is installed as a standalone proxy, WebMarshal can also forward client credentials. See Help for details.
6. To force all web requests from your organization to pass through WebMarshal, be sure to set up the other proxy software to accept requests only from WebMarshal. You can configure the LAT settings on the other proxy server, or set the other proxy software to accept requests only from a specific Windows account, which is only used by WebMarshal.
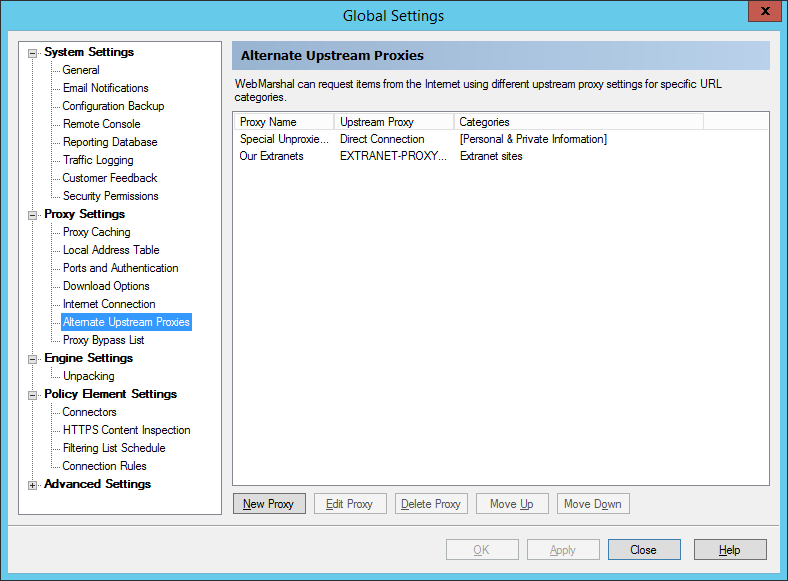
9.1.18 Configuring Alternate Upstream Proxies
The Alternate Upstream Proxies window allows you to set different methods for connection to the Web for certain URL Categories.
The purpose of this feature is to allow WebMarshal to direct requests for special sites to the proxy or direct connection that can fulfil them.
|
Notes: •Alternate Upstream Proxy settings override any settings configured for a Server Group. If a URL is in a category that is assigned to an Alternate Upstream Proxy, requests for this URL will always use the specified alternate proxy. •Alternate Upstream Proxies use the global Address Resolution Preference setting (IPv4 and/or IPv6) to resolve the proxy name, if required. |
•You can check the alternate proxy usage for any URL using the Policy Tester. For more information, see “Testing Access Policy”.
•Each Alternate Proxy entry can be configured with the same settings as the main internet connection, including port, authentication, credential forwarding, and direct connection.
Figure 37: WebMarshal Properties, Alternate Upstream Proxies window
For full details of this feature, see Help.
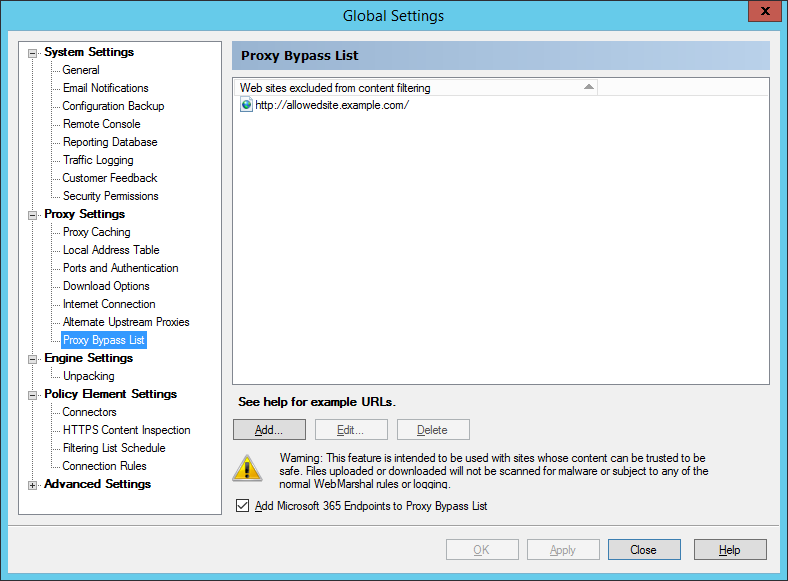
9.1.19 Configuring the Proxy Bypass List
On this window, you can enter a list of web sites that you want to completely exclude from all WebMarshal Rules.
|
Caution: The intended purpose of this exclusion list is to provide clear access to sites required by non-browser applications that may be unable to connect through an authenticating proxy. Caution is required as no virus scanning or filtering will be performed on the sites in this list. |
Figure 38: WebMarshal Properties, Proxy Bypass List window
To add a new site:
1.Click New.
2.Enter a URL including protocol within the edit box.
•To include a wildcard within a domain entry, use *. For example:
•http://*.trustwave.com/
•http://www.microsoft.*/
•http://203.0.113.*/
•Only one wildcard character per entry is allowed.
•Wildcards cannot be used in IPv6 literals.
•Wildcards in IPv4 literals only apply to browsing by IP address (not to sites in a network range).
3.Click Enter to accept the URL and open another editing line.
4.Press <Escape> to stop adding URLs.
5.To edit or delete a site in the list, highlight it and then click Edit or Delete.
6.You can also include Office 365 endpoints, based on the Office 365 URLs and IP address ranges service provided by Microsoft. WebMarshal automatically updates this list daily. To include this list, check the box at the bottom of the page.
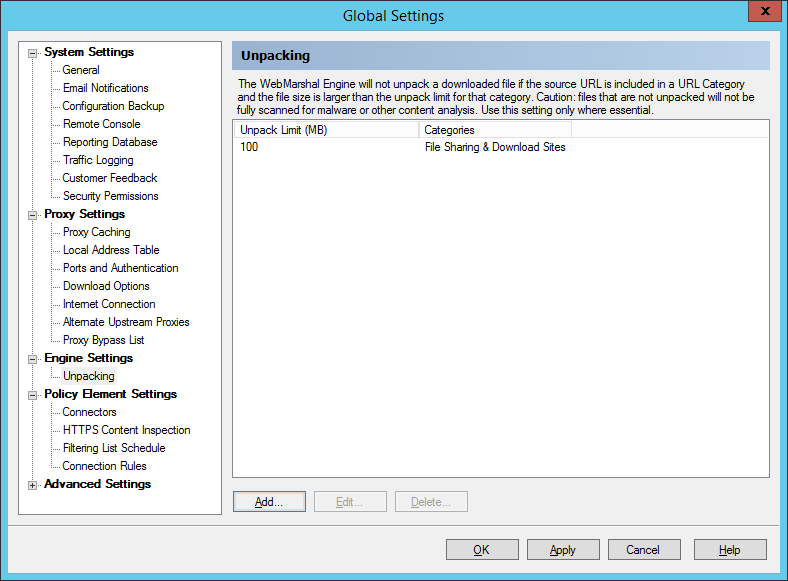
The Unpacking window allows you to set up a list of URL Categories containing URLs that might host files larger than a specified size. You can choose to skip unpacking and scanning for URLs in these categories.
The purpose of this setting is to enhance performance or allow download of extremely large files that cannot be unpacked due to size, or that result in a client browser timeout while unpacking.
|
Caution: This setting results in the affected files being passed through with reduced malware scanning and other policy checks, because any files included in an archive or document will not be separately scanned. It should only be used for locations hosting business critical files that are routinely downloaded, where experience shows that unpacking fails. For example some very large software images meet this definition. You should set the size limit as high as possible, and include only a few very specific URL paths in the categories. |
To configure this feature:
1.Create a URL Category and include the URL paths required.
2.On the Unpacking window, click Add.
3.Enter a size limit. Files larger than the limit will not be unpacked. You can enter 0 (zero) to exclude all files.
4.Select a category that the limit should apply to. Click OK.
5.Repeat the above steps to create entries with different size limits. If a URL is included in multiple categories, the smallest limit will apply.
Figure 39: WebMarshal Properties, Engine Unpacking window
The Connectors window shows all installed directory connectors. Directory connectors allow WebMarshal to import user accounts, and to authenticate browser requests by pre-existing user logon.
Figure 40: WebMarshal Properties, Connectors window
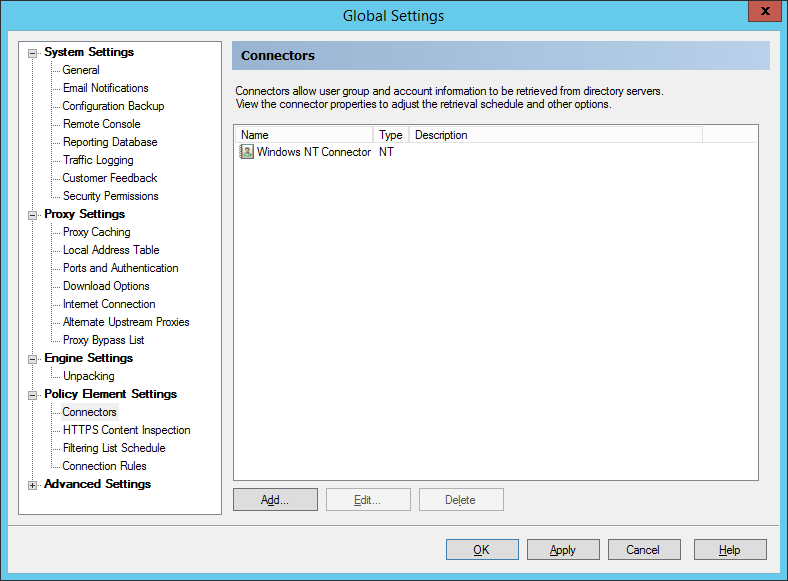
You can install connectors for Active Directory, legacy Windows NT, and Novell (NDS). You can only have one connector of each type at a time.
|
Note: Active Directory is the preferred connector for importing Windows user information. •Before installing the NDS connector, you must install NDS client software on the WebMarshal server computer. •NDS users are authenticated through Basic authentication. If you are using both NDS and Windows integrated authentication (Kerberos/NTLM), Trustwave recommends that you configure separate ports for the two authentication types. For more information, see “Configuring Ports and Authentication” and “Proxy Ports and Authentication”. |
To install a new connector:
1.Click Add.
2.Select the type of connector.
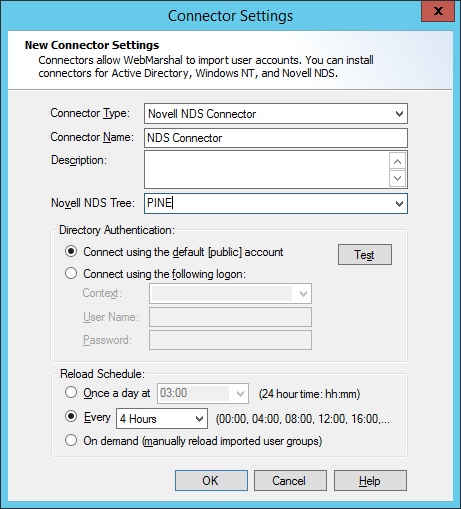
3.If you selected a NDS connector, enter or select a NDS Tree from which to import information. Choose whether you want to use the [public] account or a specific user account.
4.If you selected a Windows NT connector, choose whether you want to connect using the default (LocalSystem) account or a user account.
5.If you selected an Active Directory connector, choose whether you want to connect anonymously or using a specific account.
6.Enter the account information if required. Click Test to verify the credentials.
7.In the Reload Schedule area, select a schedule of times when WebMarshal will query this directory for updated user and group information. You can choose a periodic schedule (daily, or in hours or minutes), or manual update. If you select manual update, you can reload the Groups by right-clicking User Groups and selecting Reload, or by clicking Reload Now on the individual group properties window.
8.Click OK to add the connector.
9.To import users or groups through this Connector, see the User Groups section in the main Console menu tree.
To delete a connector, select the Connector and then click Delete to delete it. Groups and users previously imported through the Connector are not deleted. This allows for import of directory information from different directories (for example, multiple NDS directories).
To edit the properties of an existing connector, select it and then click Edit to open the Connector Properties window.
9.1.22 Configuring HTTPS Content Inspection
The HTTPS Content Inspection window allows you to perform basic setup required to use HTTPS inspection in WebMarshal. You can generate a HTTPS Root Certificate and enable the HTTPS Content Inspection functionality.
9.1.22.1 HTTPS Content Inspection Concepts
HTTPS or “secure HTTP” is a protocol that allows Web applications to communicate over a secured channel (Secure Socket Layer, or SSL). HTTPS is designed to guarantee the identity of the remote web server, and to protect the data by sending it through an encrypted channel. This design makes it very difficult for intermediate devices (such as a proxy server) to view or change the data being communicated.
HTTPS guarantees the identity of a server by using a “certificate” that is issued to the server. The certificate is in turn guaranteed by an issuing authority. Web browser software typically hold a number of “root” certificates that it can use to determine whether the issuing authority for a server certificate is trusted.
HTTPS encrypts the data channel using a public-private key process. Data that is encrypted with the private key can be decrypted using the matching public key. The public key for a server is included in the server certificate. A web browser visiting a HTTPS site first requests the server certificate, and then negotiates the secure channel to the server based on this key.
WebMarshal can inspect HTTPS content as follows:
1.WebMarshal creates a unique Root Certificate for each installation. The Root Certificate guarantees the authenticity of other certificates that this WebMarshal installation creates.
2.You install the Root Certificate in each browser application on every workstation that will browse through WebMarshal.
3.When a user browses to a HTTPS site through WebMarshal, the WebMarshal server creates a certificate for that site, and returns it to the browser. The SSL connection between WebMarshal and the browser is based on this certificate.
4.WebMarshal connects to the requested site and retrieves the server certificate provided by the site. The SSL connection between WebMarshal and the server is based on this certificate.
•WebMarshal can validate the revocation status of the presented certificate. See “Enabling Certificate Revocation Checking”.
5.All communications are encrypted and secured, but WebMarshal can inspect the content.
6.WebMarshal cannot inspect and by default does not allow connections that use the obsolete SSLv2 protocol. By default, WebMarshal does not permit connections that use SSLv3, which is considered an insecure protocol. You can choose to allow SSLv3 connections. For more information, see Trustwave Knowledge Base article Q20067.
|
Caution: Although this method secures data in transmission, it raises a number of potential technical and legal issues for data privacy. You should carefully consider any applicable privacy laws and regulations before implementing this functionality. You should review the security of the WebMarshal processing servers. You should inform users about HTTPS content inspection as part of the terms and conditions of their web access. WebMarshal access policy allows you to apply HTTPS content inspection selectively by user and by site. You may choose not to inspect the content of certain trusted and sensitive connections, such as online banking. Content inspection significantly increases the CPU load on processing servers (due to decryption and encryption of content). Depending on the amount of HTTPS traffic that is inspected, you may need to improve the CPU specification of processing servers, or use more processing servers. |
9.1.22.2 Generating and deploying a HTTPS Root Certificate
Before you enable HTTPS Content Inspection, you should ensure that the WebMarshal Root Certificate is available to all clients. Any client browser that does not have the Root Certificate installed will raise an invalid certificate warning each time the user browses to a HTTPS site.
To generate a Root Certificate:
1.On the HTTPS Content Inspection window, click Generate Certificate.
Figure 41: WebMarshal Properties, HTTPS Content Inspection window
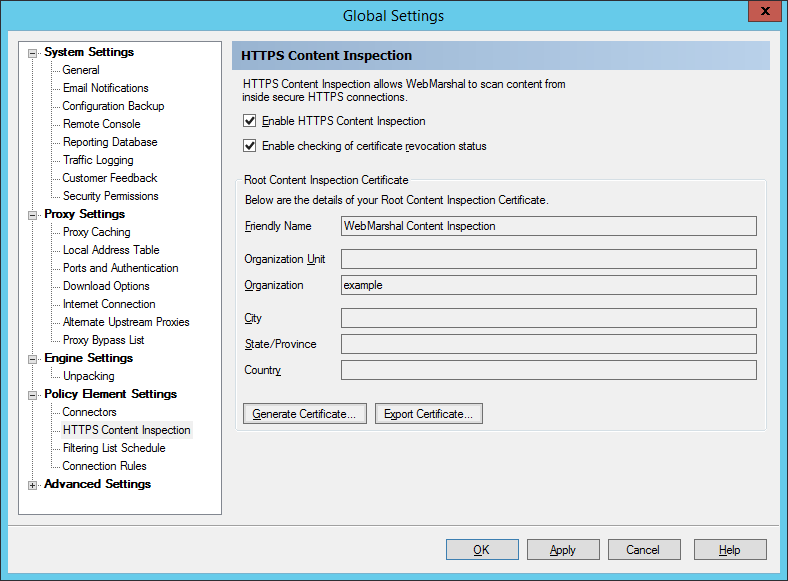
2.On the Generate Certificate window, enter information in the fields, and then click Generate Certificate. If you have already generated a certificate you will be asked if you want to overwrite it.
Most of the fields on this window are optional and all required fields are populated by default. You can enter additional information to further identify the certificate. The information you entered displays on the Global Settings page.
|
Caution: If you have deployed HTTPS Content Inspection, you should normally not generate a new certificate unless the old one has expired. When you generate a new certificate and commit configuration changes, the new certificate is immediately used by WebMarshal. You must ensure that the new certificate is installed on all client workstations. To view the properties of the existing certificate, export it to a file and then double-click to view the details in Windows certificate management. |
To deploy a Root Certificate:
1.To export the certificate (for instance, if you want to push the certificate to workstations using Group Policy), click Export Certificate. Select a location and name for the certificate file, and then click Save.
2.Ensure that all client browsers on all workstations have this certificate installed. You can install the certificate for compliant browsers using Group Policy. You can install the certificate for other browsers using a link on the WebMarshal Home page. If Windows services also require Internet access, you may need to install the certificate in a special location. For more information, see Trustwave Knowledge Base articles Q12014 and Q12015.
9.1.22.3 Enabling HTTPS Content Inspection
To enable HTTPS Rule processing, check the box on this window.
To disable HTTPS Rule processing, clear the box.
For more information about including HTTPS Rules in your Access Policy, see Chapter 6, “Understanding Web Access Policy, Rule Containers, and Rules.”
9.1.22.4 Enabling Certificate Revocation Checking
WebMarshal can validate the certificate presented by a website. Validation uses Online Certificate Status Protocol (OCSP) stapling or Certificate Revocation List (CRL) information encoded in the certificate. When this feature is enabled, WebMarshal checks the revocation status of the site certificate only. WebMarshal does not currently check for revocation of the root certificate or any intermediate certificates. WebMarshal checks OCSP stapling first for efficiency, and attempts to retrieve CRLs if the OCSP response does not return the required information. For more information about this feature, see Knowledge Base article Q20605.
To enable revocation checking, and to enable the processing of rule conditions that validate certificate revocation, check the box Enable Checking of certificate revocation status.
To disable revocation checking, clear the box.
9.1.23 Configuring Filtering List Updates
The Filtering List Schedule window allows you to configure automatic updates to any Filtering Lists configured in WebMarshal. The settings on this window affect the FileFilter and Trustwave Web Filter Database, but not URLCensor.
For more information about Filtering Lists and prerequisites for updates, see “Configuring URL Filtering Lists”.
To configure filtering list updates:
1.Check the box Check for Updates every day and select a time range to enable automatic checking of updates.
|
Tip: Automatic updates occur at a random time within the selected hour (to balance load on the update server). |
2.Click Update Now to force an immediate check for Filtering List updates.
|
Tip: Updating can cause disruption for users browsing. This action should be performed at a time when it will have minimum effect. |
9.1.24 Configuring Connection Rule Processing
The Connection Rules window allows you to enable or disable processing of Connection Rules configured in WebMarshal. Connection Rules allow you to identify and control traffic from many popular Instant Messaging and Streaming Media applications as well as connections using the WebSocket protocol.
|
Note: In order for Connection Rules to be effective, you must ensure that other ports used by these applications are blocked at the firewall. For more information, see Trustwave Knowledge Base article Q12021. |
To enable Connection Rule processing, check the box on this window.
To disable Connection Rule processing, clear the box.
For more information about including Connection Rules in your Access Policy, see Chapter 6, “Understanding Web Access Policy, Rule Containers, and Rules.”
9.1.25 Configuring Advanced Settings
The Advanced Settings (General) window allows you to configure the service logging level for each WebMarshal service. This window also allows you to:
•Set file size and retention options for the text logs
•Set detailed logging for specific workstations
•Control how often the processing servers check for updated policy
•Configure automatic purging of the WebMarshal “All Users” list
Service logs are text files on each server in the installation. By default these files include basic information about WebMarshal operation. You can choose to include full information if you need to investigate a specific problem.
|
Note: Including full information will cause the logs to grow more quickly. Only select this option when actively troubleshooting, and monitor disk space usage. |
To configure logging level:
1.Select the services you want to configure for full (debug level) logging by checking the appropriate boxes.
2.To generate basic logs for a service, clear the box for that service.
3.Click Apply or OK. You will be reminded that you must commit configuration changes to make the logging change effective.
|
Note: You can also enable debug level logging for each service on each server by editing the individual service.config.xml files found in the installation folder (for instance, WMEngine.config.xml). Set the value of debug fullTrace to “true”. Setting this value “true” in the file overrides the setting in the Options window. |
Figure 42: WebMarshal Advanced Properties, General window
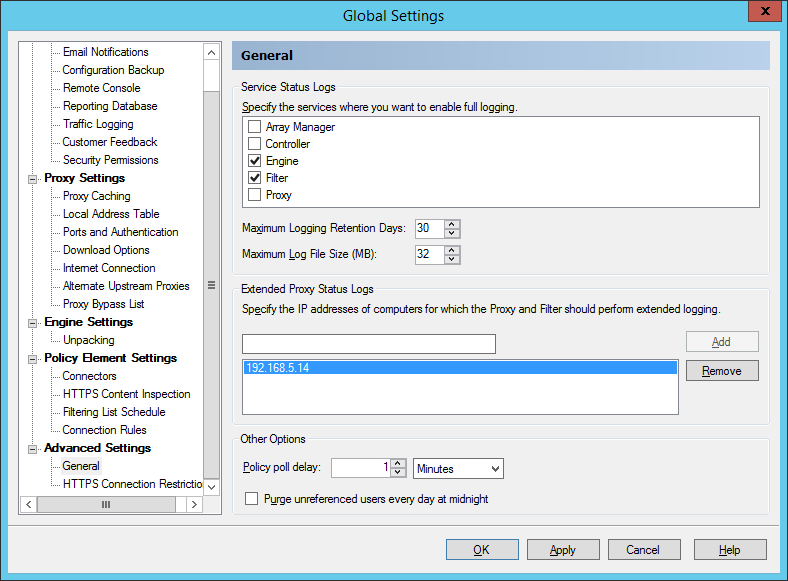
To configure logging retention and size options, use the logging retention days and log file size fields. For more information, see Help.
9.1.25.2 Extended Proxy Status Logs
You can choose to log full connection information for selected workstations if you need to investigate a specific issue. This option makes the desired information easier to find than with full logging.
To configure logging for specific workstations, use the fields and buttons in this section. For more information, see Help.
WebMarshal processing services contact the Array Manager to check for policy updates (including group membership changes). By default the check is every 60 seconds. You can set a longer interval to reduce overhead, or a shorter interval to ensure that policy is up to date.
|
Note: This setting affects single server installations as well as distributed arrays. |
To set the policy polling interval:
1.In the Policy poll delay field, enter a time in seconds.
2.Click Apply or OK. You will be reminded that you must commit configuration changes to make the change effective.
9.1.25.4 Purge Unreferenced Users
This setting allows you to automatically remove users from the WebMarshal All Users list daily at midnight. By default user names are retained on this list indefinitely, even if they do not currently appear in any User Group visible within WebMarshal.
|
Note: If you purge a user and the same user is later re-imported, the new instance will have a new unique identifier. The two instances will be treated as different users in for purposes of reporting. |
To enable daily purging, check the box. This action does not affect logging records.
9.1.26 HTTPS Connection Restrictions
On this window, you can choose to allow HTTPS connections with non-standard settings. Non-standard settings include:
•Ports other than the default 443
•Connections from software that does not identify itself with a User Agent header
These settings do not apply to any Web request that is processed by WebMarshal HTTPS Content Inspection. All inspected HTTPS connections are allowed, subject to the applicable WebMarshal Rules.
For more information about this feature, see Help.
|
Tip: These settings can be used only to provide access to business-related secure sites that would otherwise be blocked. Caution is required as no virus scanning or filtering will be performed on the sites in this list. To learn more about the security implications of the settings, see Help for this page. |


