|
Note: Schedule times are calculated in local time on the processing server that handles a request. |
7.4 Configuring Access Using Schedules
The scheduling facility allows you to apply Rules at particular times.
You can set different Quotas or Web access permissions by time of day or day of the week. For instance, an organization might block access to games sites during working hours, but allow access after hours.
|
Note: Schedule times are calculated in local time on the processing server that handles a request. |
You can apply different schedules for different user groups.
To list the rules that use a schedule, view the properties of the schedule.
1.Select Schedules in the left pane.
2.Click the New Schedule icon ![]() in the tool bar to start the New Schedule wizard.
in the tool bar to start the New Schedule wizard.

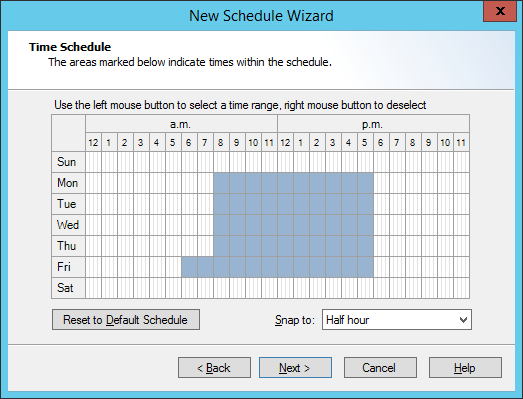
3.On the Time Schedule page of the wizard, drag with the left mouse button to add to the blue “inside” area. Drag with the right mouse button to erase from the blue “inside” area.
4.Click Set Default Schedule to reset the schedule to the default time block.
5.Choose to “snap” the schedule times to the nearest whole, half or quarter hour using the menu.
6.Click Next.
7.On the Schedule Name page of the wizard, give the schedule a name.
8.Optionally enter a description of the schedule.
9.Click Next.
10.On the Completing page of the wizard, click Finish to save the schedule, or Cancel to exit without saving.
1.Select Schedules in the left pane.
2.Double-click an existing Schedule name in the right pane to edit it.
3.Drag with the left mouse button to add to the blue “inside” area. Drag with the right mouse button to erase from the blue “inside” area.
4.Click Set Default Schedule to reset the schedule to the default time block.
5.Choose to “snap” the schedule times to the nearest whole, half or quarter hour using the menu.
6.On the General tab, edit the name and optional description of the schedule.
7.Click OK to save the changes to the schedule, or Cancel to lose any changes.
To duplicate a schedule:
1.Right-click the Schedule name in the right pane.
2.Select Duplicate.
To delete a Schedule:
1.Right-click the Schedule name in the right pane.