|
|
Notes: •You cannot use Internet Explorer to access the Management Console. •The HTTPS certificate that is automatically generated may be reported as invalid by some web browsers. You can configure another certificate using IIS. |
3.5 Running the Configuration Wizard
After you have completed a standalone installation or installed the Array Manager component in an array installation, you must run the MailMarshal Configuration Wizard. This Wizard lets you configure MailMarshal to accept email and apply rules.
When you click Finish on the final window of the MailMarshal Setup Wizard, by default MailMarshal opens the Management Console website to the configuration wizard. If you do not run this wizard after running setup, MailMarshal runs the wizard the first time you access the MailMarshal Management Console.
|
|
Notes: •You cannot use Internet Explorer to access the Management Console. •The HTTPS certificate that is automatically generated may be reported as invalid by some web browsers. You can configure another certificate using IIS. |
To run the Configuration Wizard:
1.If the Configuration Wizard is not running, start the Wizard by browsing to the MailMarshal Management Console website. Use a supported browser (Chrome, Edge, Firefox, or Safari).
2.Log in to the Management Console. For a custom install use the Username and Password you entered in the Installation Wizard. For a basic install use Username admin and Password admin.
|
|
Note: For security, you should change the default password as soon as possible after completing the Wizard. See the Authorized Users item in the Management Console. |
3.On the Welcome window, click Next.
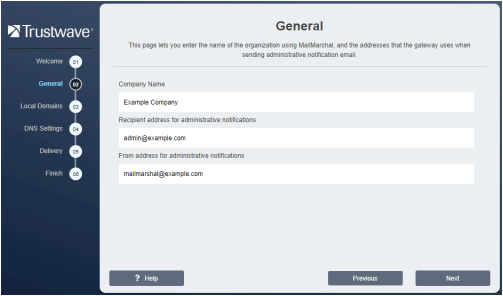
4.On the General window:

a.Type your company or organization name. This information identifies your organization when you request a license key for MailMarshal.
b.Enter a Recipient Address. MailMarshal sends administrative notifications (such as Dead Letter reports) to the address you specify in this field. This address should be a valid and appropriate mailbox or group alias within the local delivery domains of MailMarshal.
c.MailMarshal sends administrative and user notifications and other automated email from the address you specify in the From Address field. This address should be a valid address to allow for replies to notifications within the local delivery domains of MailMarshal.
5.Click Next.
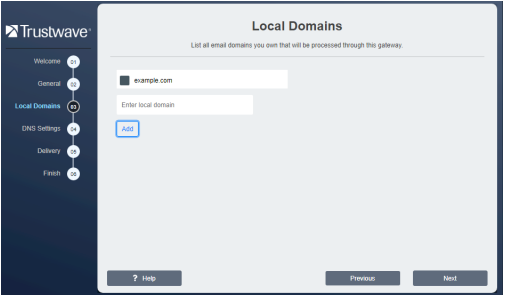
6.On the Local Domains window, enter one or more domain names for which this MailMarshal server will accept incoming mail.
a.Enter a domain name, and then click Add.
b.Repeat the above steps for each local domain
c.To delete an existing entry, select it and then click Remove.
d.To change an entry, delete it and then add it again.

7.Click Next.
|
|
Note: You will set the delivery location in a later step. To choose advanced options (such as POP3 delivery and multiple delivery locations), after completing the wizard you can edit Routes. |
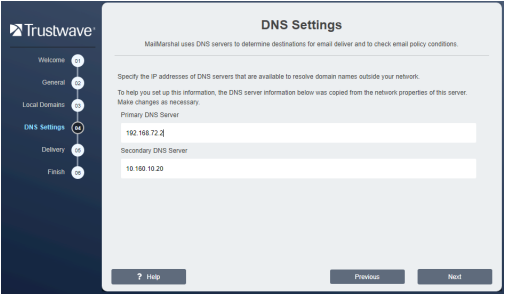
8.On the DNS Servers window, enter the addresses of servers MailMarshal uses for domain name resolution. The wizard pre-populates the fields using Windows DNS settings, but MailMarshal performs DNS lookups independently of the Windows settings. The DNS servers used by MailMarshal should be located no further away than your ISP.
|
|
Note: If MailMarshal must perform DNS lookups through a firewall, the firewall must permit both TCP and UDP based lookups. |
a.Enter the IP address of the primary DNS server. You must enter a valid IPv4 or IPv6 address.
b.Enter a secondary address. You can leave this entry blank, but your configuration is more robust if you supply a secondary DNS server.

c.Click Next.
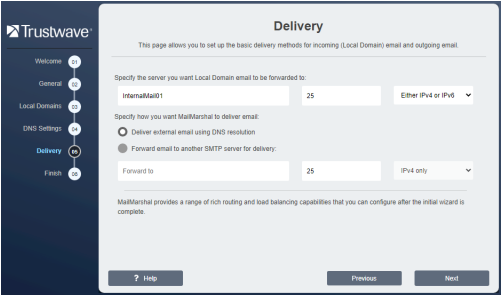
9.On the Delivery window, specify the methods MailMarshal will use by default to deliver inbound and outbound email.
|
|
Note: After you complete the wizard, you can configure other delivery options, including POP3 delivery, load balancing, and multiple routes. For more information, see “Configuring Delivery Options” and “Customizing Settings for Nodes”. |
a.Enter the server name, fully qualified domain name, IPv4 address, or IPv6 address, and the port of a local server that MailMarshal will use to deliver all incoming email (addressed to local domains).
•If you entered a name, you can choose to deliver mail over IPv4, IPv6, or either protocol.
b.Choose to deliver outgoing email directly using DNS lookup, or to forward email to another server for delivery.
c.If you select “forward email to another SMTP server”:
•Specify the server name, fully qualified domain name, IPv4 address, or IPv6 address, and the port of the server (usually port 25). For instance, use this option to send all outbound email through the email servers at your ISP.
•If you entered a name, you can choose to deliver mail over IPv4, IPv6, or either protocol.

d.Click Next.
10.Review the Completing window, and then click Finish.
When you complete the Configuration Wizard, MailMarshal starts the email processing services and opens the main Management Console page. Use the Management Console to perform additional configuration tasks. You will need to complete some tasks to implement minimum best practices for MailMarshal installation and email filtering. For more information, see “Configuring Email Routing”, “Configuring Antivirus Scanning”, and “Configuring Antivirus Scanning”.