3.4 Installing MailMarshal as an Array
A MailMarshal array consists of a MailMarshal Array Manager and one or more MailMarshal Servers. The Array Manager hosts the user interfaces and manages the database connection. The Array Manager exports the same rules and other configuration to all MailMarshal Servers connected to it.
First, install the Array Manager and database on a computer in the trusted network. Then, install the MailMarshal Server software on one or more computers in the DMZ to work as an array of email processing servers. Each MailMarshal Server receives email and processes it using your rules.
Base the number of servers you install on your email volume. You can add servers later as needed. For more information about an array installation and requirements, see “Array Installation” and “Array Installation Requirements”.
3.4.1 Installing a MailMarshal Array Manager
To install MailMarshal in an array configuration, first install the Array Manager component on the computer you selected as the Array Manager computer.
To install the Array Manager:
1.Ensure you have installed all prerequisite software specified for an array installation. For more information, see “Array Manager Requirements” and “Installing Prerequisite Software”.
2.Log on to the computer as a member of the local Administrators group.
3.Close any open applications.
4.Run the MailMarshal installation package.
5.On the Setup tab, click Install MailMarshal.
6.On the Welcome window, click Next.
7.On the License Agreement window, carefully read the license information.
8.Click I accept the terms of the license agreement, and then click Next.
9.On the Setup Type window, select Custom Install, and then click Next.
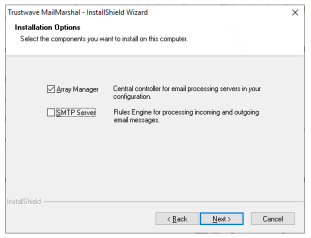
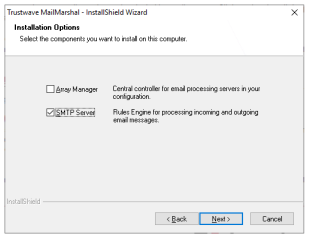
10.On the Installation Options window, ensure Array Manager is selected. The MailMarshal Management Console user interface is installed by default when you install the Array Manager component.
11.Clear SMTP Server, and then click Next. The installer verifies the presence of IIS, required for the Management Console website.
12.On the SQL Server Options window, choose to use an existing SQL server or install SQL Express locally (if the installation package includes SQL Express).
13.On the Choose Installation Location window, optionally change the installation and folder locations.
14.On the Configuration Services and Management Console Websites window, set site names and ports for the MailMarshal Configuration Service and Management Console websites.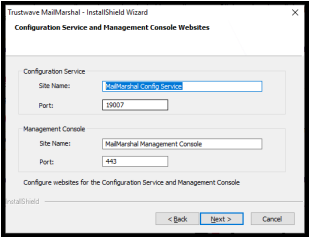
15.On the Configuration Service Administrator window, specify a Windows username and password, full name and email address for the Config Service.
|
|
Note: These credentials are used as the initial login for the MailMarshal Management Console website. You can create other credentials after completing installation. |
16.On the MailMarshal Configuration Service Database window, set SQL Server options for the MailMarshal Configuration Service database.
a.Specify a local or remote SQL server. If the endpoint is an Availability Group or Failover Cluster Instance, select Multi-Subnet Support to improve failover performance (see Microsoft documentation for details).
b.Specify a database name (by default, MailMarshalConfigService).
|
|
Note: A database name must start with a letter (a..z) or an underscore (_). The name can also contain digits (0..9). Other characters including the hyphen (-) are generally NOT allowed. |
c.Choose an account to use for database access. This account can be a Windows or SQL Server account. If the SQL Server is on the same computer as MailMarshal, you can use the Application Pool account (the Application Pool Identity of the MailMarshal Management Console website).
|
|
Note: You can change the account information later using the MailMarshal Config Service Admin Tool. |
17.Click Next. MailMarshal verifies the database information. If the database you selected already exists, you can choose options to use it, or cancel and provide a different database name. The available options depend on the database that is actually found.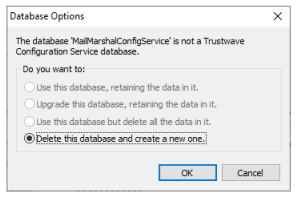
18.On the MailMarshal Database window, set SQL Server options for the MailMarshal database.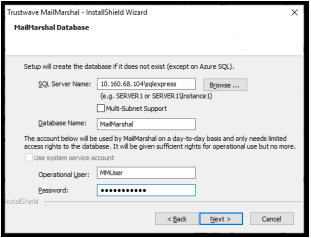
a.Specify a local or remote SQL server. If the endpoint is an Availability Group or Failover Cluster Instance, select Multi-Subnet Support to improve failover performance (see Microsoft documentation for details).
b.Specify a database name (by default, MailMarshal).
|
|
Note: A database name must start with a letter (a..z) or an underscore (_). The name can also contain digits (0..9). Other characters including the hyphen (-) are generally NOT allowed. |
c.Choose an account to use for database access. This account can be a Windows or SQL Server account. If the SQL Server is on the same computer as MailMarshal, you can use the system service account (the Local System account used by default to run MailMarshal services). MailMarshal can also configure an “operational user” account with limited permissions, and use this account for most processing. For full information about available database connection and security options, see Trustwave Knowledge Base article Q12939.
|
|
Note: You can change the account information later using the MailMarshal Server Tool. |
19.Click Next. MailMarshal verifies the database information. If the database you selected already exists, you can choose options to use it, or cancel and provide a different database name. The available options depend on the database that is actually found.
20.Follow the instructions in the setup program until you finish installing MailMarshal.
21.On the Setup Complete window, ensure Open the Management Console Website is selected, and then click Finish. The Management Console opens in the default browser. The Management Console installs by default as the default HTTPS website of the local machine.
|
|
Notes: •You cannot use Internet Explorer to access the Management Console. •The HTTPS certificate that is automatically generated may be reported as invalid by some web browsers. You can configure another certificate using IIS. |
You must complete the Configuration Wizard in the Management Console website before MailMarshal can receive email and apply rules. For more information, see “Running the Configuration Wizard”.
3.4.2 Installing a MailMarshal Server
To complete a MailMarshal array installation, first install the MailMarshal Array Manager. Then, follow the steps to install a MailMarshal Server on additional computers. You can install additional email processing servers initially or add them later as needed.
To install the MailMarshal Server components:
1.Ensure you have installed all prerequisite software specified for a MailMarshal Server computer. For more information, see “Server Requirements” and “Installing Prerequisite Software”.
2.Log on to the computer you plan to use as a MailMarshal Server as a member of the local administrator group.
3.Close any open applications.
4.Run the setup program from the MailMarshal installation kit.
5.On the Setup tab, click Install MailMarshal.
6.On the Welcome window, click Next.
7.On the License Agreement window, carefully read the license information.
8.Click I accept the terms of the license agreement, and then click Next.
9.On the Setup Type window, select Custom Install, and then click Next.
10.On the Installation Options window, ensure SMTP Server is selected.
11.Clear Array Manager, and then click Next.
12.On the MailMarshal Array window, enter the name of the MailMarshal Array Manager that you will use to manage policy for this server. The name can be the computer name, IP address, or Fully Qualified Domain Name.
13.If you have changed the default MailMarshal port, enter the new value in the Port field.
14.If you are not logged in as a user with permission to join the MailMarshal array, select Connect using following account and enter Windows credentials with permission to connect to the Array Manager server.
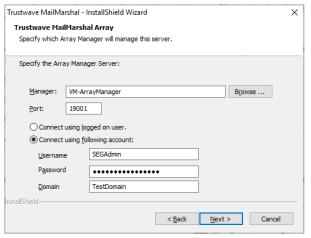
15.Click Next.
16.Enter a MailMarshal Array Join credential. To create and administer these credentials, see the Array Join tab of the MailMarshal Server Tool on the Array Manager. Both the username and password are case sensitive. The default credential is:
•Username: arrayJoin
•Password: the server name of the Array Manager computer in uppercase
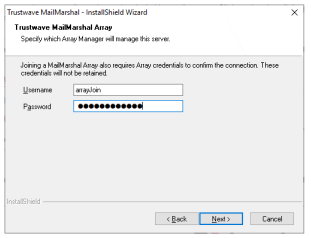
17.Click Next.
18.Continue running the setup program until you finish installing a MailMarshal Server.
19.On the Setup Complete window, click Finish to close the setup wizard. The server retrieves configuration information from the Array Manager immediately and begins accepting email connections.
20.If you plan to install the MailMarshal Server on additional computers, repeat the MailMarshal Server installation process on the other computers.
