This article applies to:
- Trustwave MailMarshal (SEG) 8.0 and above
- DMARC
Question:
- How do I set up SEG to participate in DMARC?
- How do I generate a DMARC record for a domain?
Reply:
Trustwave MailMarshal (SEG) 8.0 and above provides the ability to participate in DMARC (Domain Message Authentication Reporting and Conformance) for email authentication.
When DMARC is configured:
- MailMarshal will send aggregate reports to the RUA address specified by each sending domain that uses DMARC.
- MailMarshal can apply the DMARC policy specified by the sending domains (depending on the rules you enable).
- You can review DMARC results for your own domains, by sending aggregate reports (RUA) to a third party service.
This article provides a simple overview of the requirements and procedures to enable DMARC. For more information see the product Help and the related articles listed below.
To set up DMARC:
DMARC requires that you configure SPF and DKIM for message validation. You must also configure at least one of these protocols for outbound messages, so that other servers can validate messages from your domain.
- Enable DKIM for each domain.
- Enable SPF for each domain.
- Generate and publish a DMARC DNS record for each domain (see below). Ensure that the record is published. The DMARC setup window in the SEG Configurator checks for a valid record.
- Important: To ensure validation of the record succeeds, this record must exist on the DNS server configured in MailMarshal. If MailMarshal uses an internal DNS server and the public DNS records are not replicated to that server, you must also create the record on the internal server.
- Enable DMARC for each domain.
- Configure and enable DMARC rules. Three DMARC related rules are included in the default rules for SEG 8.0 and above. The DMARC rules are also added to an upgrade policy set when SEG is upgraded to 8.0 or above.
- Note that the DMARC policy group is disabled by default, because you must ensure that other configuration is complete before using DMARC.
- The rule to detect incoming DMARC report email (and move it to a folder for later automatic processing) is evaluated after the rules that apply DMARC policy, because the DMARC RFC states that you should only accept incoming DMARC reports from senders that have correctly configured DMARC. (In SEG 8.2 and above, the default rule explicitly enforces DMARC conformance for reports.)
- SEG 8.2 and above honors the optional PCT keyword for incoming messages, which specifies that only a certain percentage of mail from a domain should be checked.
DMARC DNS Record basics
The DMARC DNS record specifies how you want other servers to validate messages from your domains, and where they should send reports.
For details of the available options a good starting place is the dmarc.org Overview. See also the specification in RFC 7489.
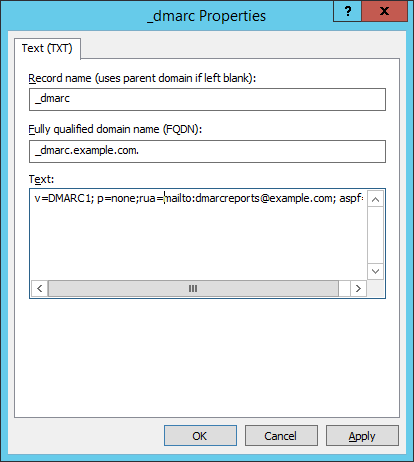
- Create a DNS Resource Record of type TEXT with a record name like _dmarc.domain.TLD
- Note the record name MUST start with _dmarc (including the underscore)
- For example, the Resource Record name for domain example.com is _dmarc.example.com
- The text content of a simple starter record is like the following:
v=DMARC1; p=none; rua=mailto:dmarcreports@example.com; aspf=s

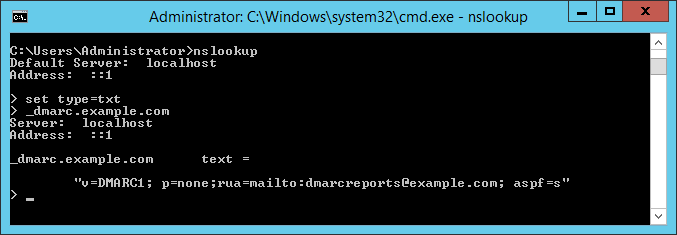
- Looking up the record with NSLookup returns a result as shown below:

- The above record
- specifies "strict" checking of SPF (the default is "relaxed")
- Requests reports to the email address shown - this should be an address provided by a third party reporting service.
- Specifies a policy of "none" - the recipient should not reject or quarantine any messages simply because they do not align with this DMARC policy (note that the recipient could reject or quarantine the messages for other reasons)
- After reviewing the reports and confirming that valid messages from your domains do pass evaluation, you can request that recipients take action on messages that do not align with the policy, by changing the policy to "quarantine" or "reject".
Changing the DNS server setting
MailMarshal (supported versions) validates the public availability of DKIM keys using a DNS query from the Array Manager to the DNS servers configured in MailMarshal, and also to a public DNS server (by default using Google public DNS: 8.8.8.8). Using a public DNS server helps to test that the key has replicated widely. This setting is also used for DKIM validation.
For validation checks to work properly, you must ensure that both the local and public DNS environments hold this information.
You can change the public DNS server used, by making an entry in Management Console Advanced Settings (8.2 and below: editing the Registry).
10.0 and above:
- In the Management Console, add an Advanced Setting as follows:
- DNS.ThirdPartyServer
- Type: String
- Value: the IP address of the DNS server you want to use.
- Commit Configuration Changes.
- Restart MailMarshal services on the processing servers.
8.2:
- On the Array Manager, edit the Registry.
- Navigate to the SEG DNS key:
- In version 8.X: HKEY_LOCAL_MACHINE\SOFTWARE\Trustwave\Secure Email Gateway\Default\DNS
- For full details of the location for each product version, see article Q10832.
Add a String (REG_SZ) value ThirdPartyServer and set the value to the IP address of the DNS server you want to use.
-
Commit configuration changes.
-
Restart the Array Manager service.
For details of the registry locations for each SEG version, see article Q10832.
Notes:
MailMarshal 8.X accepts aggregate DMARC report email (RUA email), and allows you to query the results through a "DMARC Dashboard" in the Console.
MailMarshal 10.0 and above does not provide the DMARC Dashboard functionality. With this version you must use a third party service, and set the RUA address to deliver aggregate reports to that service.