3.1 Setup Wizard
1.Run the WebMarshal installer from the Web download.
2.Carefully read the information given on the Welcome to the WebMarshal Setup Wizard page and the License Agreement page. When you click I Accept on the License Agreement page, you accept the terms of the License.
3.The installer checks for required prerequisite software that it can install. If any required prerequisites are not present, the installer offers to install them.

|
Note: You must install these prerequisites to continue with product installation.
•Installation of .NET Framework may require system restart. As part of the .NET Framework installation you must accept a Microsoft license agreement.
•Installation of the prerequisites does not normally interfere with any previously installed software.
|
4.On the Choose Destination Location page, choose the folder where the program files will be installed.
5.On the Select Components page, select the appropriate type of installation:
a.If you are installing a single server complete installation, or an Array Manager with Processing Server: Select both Install Console and Install Services. On the Select Services page, select Standalone Server to install the Array Manager, Processing Server, and Console.
b.If you are installing an Array Manager only: Select Install Services. On the Select Features page, select Array Manager Only to install the Array Manager.
|
Note: In most cases you should also select Install Console on the Array Manager computer. Installing the Console locally ensures that you will be able to manage WebMarshal. You can install the Array Manager without a Console for enhanced security (for instance, if the Array Manager is located in a DMZ). You must then install the Console in another location that can connect to the Array Manager.
|
c.If you are installing a Processing Server only: Select Install Services. On the Select Services page, select Content Processing Node Only.
d.If you are installing an additional Console, select Install Console and clear Install Services.
6.Click Next to continue.
7.If you are installing an Array Manager using the installer version that includes SQL Express, on the Select SQL Server page, you can select I want to install and use Microsoft SQL Express to start installation of SQL Express.
|
Note: If the installer identifies a usable installation of SQL Server or SQL Express on the server, this page does not display.
|
a.Accept the Microsoft EULA.
b.Click Install to install prerequisites. Click Next as required to continue with installation.
c.If you choose to install SQL Express, you can accept all default values in the SQL Express installation wizard. For help with the fields and options on this wizard, click Help.
d.Complete the SQL Express setup to continue with WebMarshal setup.
|
Note: To allow access to the database from other computers (for instance to allow the Marshal Reporting Console to connect from another server), this setup enables the Named Pipes and TCP/IP protocols. You can change these settings using the SQL Server Configuration Manager.
|
8.If you are installing a Processing Server, on the Array Manager Location page enter the name or IP address of the Array Manager. Enter the Port Number if you have changed this setting on the Array Manager (default: 19101). If you have restricted the accounts that can connect, select Connect using a specific account and enter account details.
9.On the Ready to Install the Program page, click Install to start installation.
10.If you are installing a Processing Server, the server will attempt to connect to the Array Manager using the details you entered. If the connection fails you can enter corrected details.
|
Note: If the connection continues to fail, you can still finish the product installation. After finishing installation, correct any problems preventing connection, and then run the WebMarshal Server Tool on the processing server to create the connection.
|
11.If you are installing a Processing Server or Complete installation, on the Anti-Malware Scanners page, you can choose to install or update one or more anti-malware scanners included in the installation package.
Figure 5: Installation Wizard, Anti-Malware Scanners window
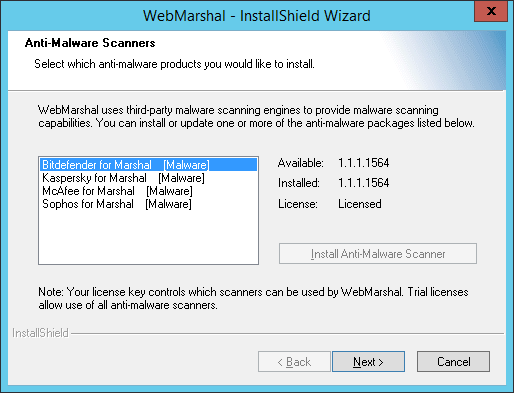
•The list shows available scanners. Select a scanner to view details of the available version, installed version if any, and licensing status.
•To install or update the selected scanner, click Install Anti-Malware Scanner.
•At the end of installation of the selected scanner, you can choose to configure scanner updates. You can also configure updates later by running the scanner configuration tool, found in the WebMarshal program group on the Windows Start menu.
•Once installation of the selected scanner is complete, control returns to the WebMarshal installer. You can choose to install another scanner, or click Next to finish WebMarshal installation.
|
Note: To complete integration of the scanner with WebMarshal, add it from the Configuration Wizard, or the Malware Scanners item in the WebMarshal Console.
•WebMarshal checks the readiness of each scanner including initial download of updates. Configure and verify updates for each scanner before you add it in the Console.
|
3.1.1 WebMarshal Array Manager Or Complete Installation
When the Setup Wizard Complete page displays, choose whether or not to launch the Console. You must run the Console and complete the Configuration Wizard to enter your license key and finish configuration.
3.1.2 WebMarshal Console Installation (on a separate computer)
The first time you run the WebMarshal Console on a separate computer, you must specify the name of the WebMarshal server and a valid account to connect. You can browse the network to find the server.
3.1.3 WebMarshal Processing Server Installation (on a separate computer)
When the installation is complete, the WebMarshal services start. The processing server connects to the Array Manager to update configuration settings.