This article applies to:
- SWG 11.x High Availability Policy Server environment
Question:
- How to apply an SWG license in a High Availability Policy Server environment?
Procedure:
This procedure refers to a HA PS environment that has been licensed in the past and a new license key needs to be applied to it.
1. Log in to the Policy Server and navigate to Administration > Updates and Upgrades > Configuration.
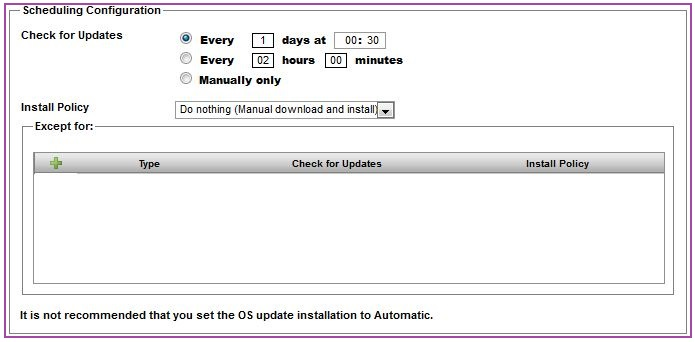
2. Make sure that the Install Policy is set to Do nothing (Manual download and install) and that no exceptions are set, as shown below:
3. Make sure no updates are listed in the Available Updates tab under Administration > Updates and Upgrades > Management.
4. Open Administration > System Settings > License and paste the license key for this Policy Server. Save and Commit if required.
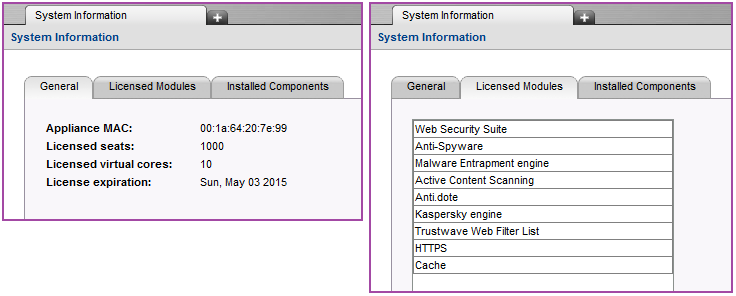
5. A confirmation screen opens if the license initialization is successful. Make sure the license details listed in the Licensed Modules tab matches your SWG license options:
6. Save the details for your records and future reference.
7. Navigate to Administration > Updates and Upgrades > Management and retrieve updates manually.
8. Refresh the view in the Available Updates tab and check that new updates are populated.
If no updates appear, do not proceed as there may be networking issues preventing the Policy Server from getting security updates.
9. Do not install any updates at this point and remove all update entries manually.
10. Promote HA Policy Server using the failover command executed on the limited shell of the Primary Policy Server.
It may take a few minutes for the system to process this request.
11. Log in to the Policy Server (the former HA PS should now be acting as the Primary PS) and wait until all devices are synchronized in the Devices tree.
12. Navigate to Administration > Updates and Upgrades > Configuration.
13. Make sure Install Policy is set to Do nothing (Manual download and install) and that no exceptions are set, as shown in step 2.
14. Open Administration > System Settings > License and paste the same license key for this Policy Server. Save and Commit if required.
15. A confirmation screen opens if the license initialization is successful.
16. Make sure Licensed Modules and all other license details in the confirmation screen match those on the former Primary Policy Server in steps 5-6.
They should be identical.
17. Navigate to Administration > Updates and Upgrades > Management and retrieve updates manually.
18. Refresh the view in the Available Updates tab and check that new updates are populated.
If no updates appear, there may be networking issues preventing the Policy Server from getting security updates.
19. Navigate to Administration > Updates and Upgrades > Configuration and restore Install Policy settings, according to what was set prior to the license change.
20. Save and Commit changes if required.
21. Promote the current HA Policy Server (formerly the Primary Policy Server) using the failover command executed on the limited shell of the current Primary Policy Server.
It may take a few minutes for the system to process this request.
22. Log in to the Policy Server (the former HA Policy Server should now be acting as HA Policy Server again) and wait until all devices are synchronized in the Devices tree.
23. Navigate to Administration > Updates and Upgrades > Configuration and restore Install Policy settings, according to what was set prior to the license change.
24. Save and Commit changes if required.
25. Navigate to Administration > Updates and Upgrades > Management and retrieve updates manually.
The system should now apply security updates according to Install Policy settings.