This article applies to:
Question:
- How can I enhance SEG/MailMarshal performance and resilience?
- How can I load balance MailMarshal?
Information:
The aim is to have two load-balanced MailMarshal Node servers. MailMarshal is designed with just this sort of architecture in mind.
This article give basic conceptual information and general steps to achieve this aim. For full details of each step, see the documentation for your MailMarshal version.
Figure 1 shows a simple, one server MailMarshal installation:
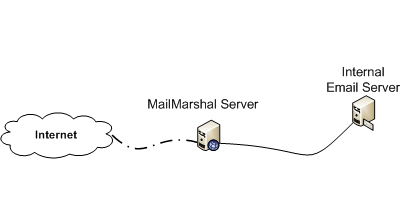
Figure 1
Simply adding a second MailMarshal Node to the existing Array gives you the setup in Figure 2:
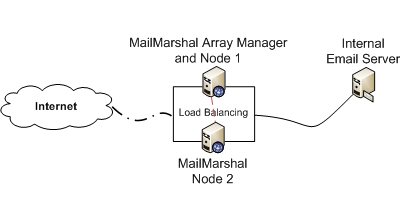
Figure 2
However, given that you have two Node servers, you need to implement some form of load balancing. The simplest way to do this is to set up DNS round-robin for the two IP addresses. Alternatively, set up an MX for each IP with equal priority on both.
With Figure 2, you end up with two uneven Node servers. Node 1 also functions as an Array Manager, and you may be running SQL server on the same machine.
Figure 3 shows an ideal, well balanced setup. The two Node servers are dedicated to the proxy processing task. The Array Manager and SQL Server roles have been moved to a third server.
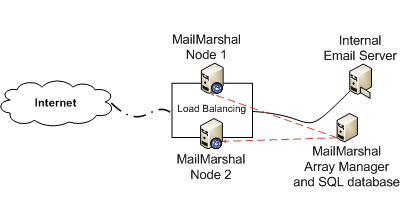
Figure 3
Both Figure 2 and Figure 3 get you to a situation where failover is built in to your design. So, for example, when upgrading, you could upgrade one node at a time without any major downtime.
How to achieve your outcome
To get from Figure 1 to Figure 2:
- Make sure your existing MailMarshal Server is the same version as the version you are installing on the new system.
- Install MailMarshal on a new server. During the install, select ‘Custom’. On the ‘Select Services’ page, select ‘SMTP Processing Node Only’.
- During the installation, when prompted, join the new server to your existing array. Or, when finished, run the MailMarshal Server Tool, and join the server to the array.
- On the original server, verify that the new server has been added under ‘Array Servers’ in the MailMarshal Console.
- Set up DNS round robin, or NLB, to include both servers.
- Configure incoming SMTP traffic to be delivered to the new shared hostname or IP address.
- Configure you internal mail server to deliver outbound mail to the new shared hostname or IP address.
- Test that both Node servers are seeing and handling traffic OK.
To get from Figure 1 to Figure 3:
There are several ways to achieve what you need. Here’s one possible path.
- Make sure your existing MailMarshal Server is the same version as the version you are installing on the two new systems.
- Install MailMarshal on a new Node (Node 1). During the install, select ‘Custom’. On the ‘Select Services’ page, select ‘SMTP Processing Node Only’.
- During the installation, when prompted, join the new server to your existing array. Or, when finished, run the MailMarshal Server Tool, and join the server to the array.
- On the original server, verify that the new server has been added under ‘Array Servers’ in the MailMarshal Console.
- Repeat Steps 2 – 4 for Node 2.
- Set up DNS round robin, or NLB, to include both servers.
- Configure incoming SMTP traffic to be delivered to the new shared hostname or IP address.
- Configure your internal mail server to deliver outbound mail to the new shared hostname or IP address.
- Test that both Node servers are seeing and handling traffic OK.
- The original MailMarshal server is now decommissioned as a Node server, but retains the Array Manager function.
Notes:
For even further resilience, you could set up the Array Manager on a Windows failover cluster.