This article applies to:
Description:
Secure Web Gateway (SWG) appliances are designed to scan inbound/outbound traffic and to take specific actions (allow or block) on various contents as prescribed by the security policy.
Several conditions may be used in the policy rule to trigger the action. Exceptions for general blocking rules may also be created in order to allow specific content.
The most simple and common way to create an exception is to use a URL White List, where a list of domains is maintained by the administrator.
Once content has been blocked, other actions that do not directly involve the SWG system might be required in order to allow the content to load normally on client machines.
Symptoms:
- Users continue to see block messages from SWG after content has been white listed.
This can occur even if the white list additions have completely finished committing all all devices. This is typically the result of additional components involved in the regular traffic flow:
Browser -> Proxy -> Server -> Proxy -> Browser
Causes:
Web content that executes in a client machine's Java Runtime Environment (JRE) adds another layer to the well-known traffic flow that was mentioned above:
Browser -> Java VM -> Proxy -> Server ….
As a result, a request made from the client machine may sometimes use the Java Virtual Machine to fetch the content from the web.
The Java Virtual Machine maintains its own cache system that is designed to enhance and to optimize web requests by serving previously stored applets from local resources, similar to a browser's cache. Therefore, a change made on the proxy layer might not be apparent at the client until the Java VM's cache is cleared.
Resolution:
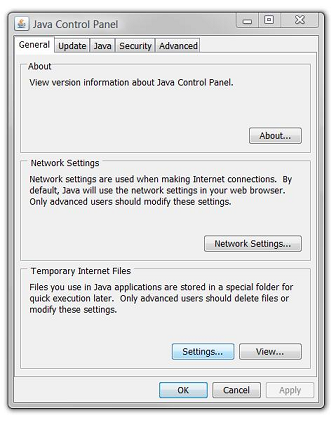
To review the Java VM's caching options, open the Java item in the Control Panel. The exact options and window design vary depending on the JRE version(s) installed on the client machine.

Click the View button to view cached objects. It is possible to delete individual objects instead of clearing all cached content by right clicking an applet, as shown below:

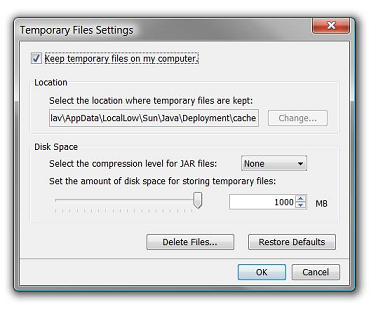
To clear the whole cache or disable Java caching altogether, click the Settings button on the main Java Control Panel window and perform the appropriate task below:
- To remove all cached applets completely, click the Delete Files… button.
- If there is no need to cache Java applets on this client machine – uncheck the Keep temporary files on my computer option.
