This article applies to:
- Trustwave MailMarshal (SEG)
Question:
- How do I manually create a list of allowed addresses and use it within a rule?
An "allow list" is a list of known "friendly" email senders. The allow list can be included within MailMarshal rules and results in less false positives for recipients. It also allows the filtering rules to be stricter which provides more efficient email processing as friendly senders are not tested against Spam and Junk mail rules.
New installations of current versions create two groups called Global Whitelist and Harvested Whitelist, which can be used as Allow Lists. Some much earlier versions of MailMarshal SMTP did not automatically create these lists. If you have upgraded from an earlier version, you can create one as described.
This article includes two parts: How to manually create an Allow List user group, if one is not present, and how to use that group within a rule.
Note: Allow Lists can be useful but can cause other issues if not constructed and used carefully. See the notes on excessive allowlisting, and other best practices, in Trustwave Knowledge Base article Q10810.
Procedure:
To manually create a User Group use the following steps.
- In the MailMarshal Management Console (8.X: the Configurator), expand Policy Elements | User Groups and click Add or New User Group.
- Create a MailMarshal user group.
- Type a Name for the user group and optional description. Complete the user group creation.
- Navigate to the new User Group and click Add or Insert Users.
- Enter an email address or domain name for the user(s) you wish to include in the User Group. Click Add or Save.
- Note: Ensure the entry does not include any spaces or other excess characters, particularly if pasting.
- Continue the process until all the domain names or email addresses you want to include have been entered.
- The Allow List has now been created. New users or domain names can be added to the user group in the future, by editing the group and repeating the steps.
To create a new rule using the manually created Allow List created above, use the following steps.
- In Email Policy, navigate to the Policy Group where you wish to place the new rule, and select Add or New Rule.
- On the User Matching Conditions window, ensure the rule applies to Incoming messages.
- To use the Allow List within the rule, select Where addressed from people or Addressed From.
- Then click on the hyperlink 'people' or 'group'.
- The User Matching Condition window is now available. Select the group from the User Groups pane and click the double arrow or drag it to add it to the Matching email addresses and user groups pane. Click Save or OK.
- Now the Rule description will show Where addressed from (your allow list group name.
- Complete the required actions (such as passing the message to the next Policy Group) and save the rule.
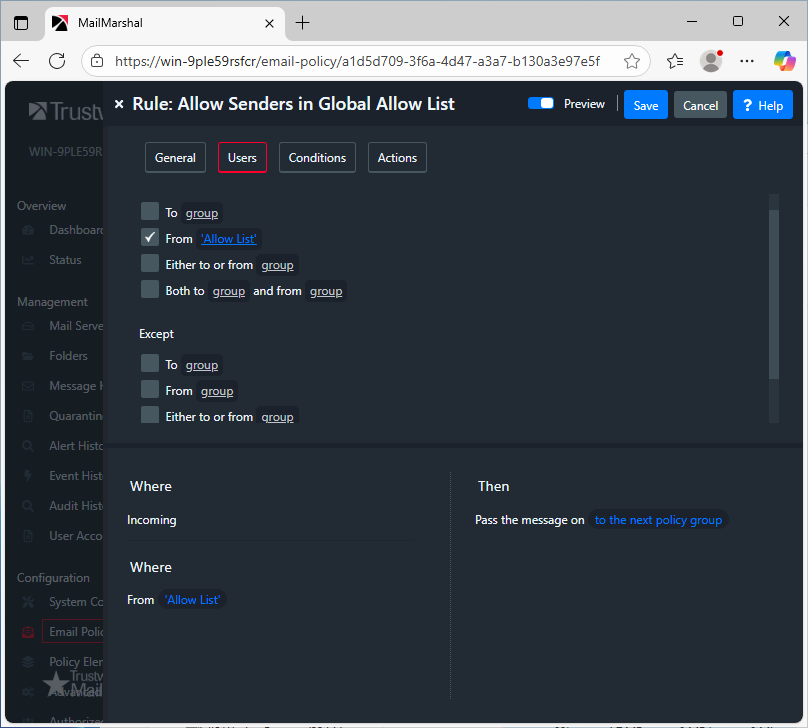
- The rule that has just been created will allow any email addresses contained in the allow list to bypass the other rules contained within the Policy group, and be passed to the next Policy Group.
Notes:
- To better understand what addresses from the email are matched and should be included in an allow list, see Knowledge Base article Q12238.
- You can quickly import addresses using the Group File Import tool. See Knowledge Base article Q11305.