This article applies to:
- Trustwave MailMarshal/SEG 8.2 and above
- Azure Information Protection Rights Management
Question:
- What setup is required for Azure Information Protection (AIP) with SEG?
- How do I get the AIP credentials and settings that I need to enter in SEG?
Procedure:
To set up AIP in SEG, you will need a Microsoft Azure account configured with AIP. This article assumes you have such an account.
Prerequisites
RMS Client
The RMS Client installer is linked from the prerequisites tab of the SEG installation autorun. You must install the RMS Client on all processing nodes.
SEG Product Key
The SEG Product Key must have Azure Information Protection enabled. Trial keys for SEG versions that support AIP include this feature. Customers who want to use this functionality should request a replacement key with the AIP entitlement enabled.
Information Needed
NOTE: To use the PowerShell commands described, you must use a minimum version of PowerShell and you must install certain modules. For details, see the Microsoft document Installing the AIPService PowerShell module.
- The earlier and now deprecated module (AADRM) has identical function.
You will need to obtain values for the following fields required in SEG configuration:
- BposTenantId: Azure Tenant Id
- AppPrincipalId: Azure user for use by MailMarshal, with super-user rights over AIP
- Base64Key: Symmetric key for AppPrincipalId
- LicensingExtranetUrl: URL for retrieving use license, templates, and other items
- LicensingIntranetUrl: URL for retrieving use license, templates, and other items from Intranet locations.
- Typically the same as LicensingExtranetUrl
Getting the Tenant ID and Licensing Url
- As an administrator, run PowerShell with the appropriate modules installed (see note above)
- Import the AIP module: Import-Module AipService
- Connect to the service, using Microsoft credentials that have appropriate permissions: Connect-AipService –Verbose
- Ensure RMS is enabled: Enable-AipService
- Get your tenant ID by running: Get-AipServiceConfiguration

Creating a Service Principal
A service principal is credentials configured globally for access control that allow a service to authenticate with Microsoft Azure AD and to protect information using Microsoft Azure AD Rights Management.
If you do not already have a service principal for use with MailMarshal, follow the following steps:
- As an administrator, run PowerShell with the appropriate modules installed (see note above)
- Import the Microsoft Azure AD module using: Import-Module MSOnline
- Connect to your online service with the assigned user credentials: Connect-MsolService
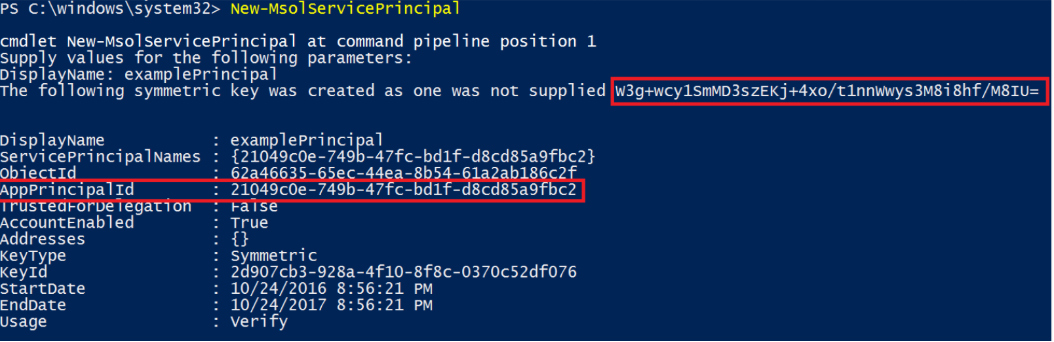
- Create a new service principal by running: New-MsolServicePrincipal
- Provide a name for the Service Principal
- Record the results (symmetric key and AppPrincipalID)
- CAUTION: The symmetric key credential expires. You will need to create a new one periodically using:
new-msolserviceprincipalcredential
Enabling the Super User feature
MailMarshal requires super user feature to be able to decrypt all messages for the domain. To enable this for the created principal, follow the following steps:
- As an administrator, run PowerShell with the appropriate modules installed (see note above)
- Import the RMS module: Import-Module AipService
- Connect to the service with the assigned user credentials: Connect-AipService –Verbose
- Enable the AIP super user feature: Enable-AIPSuperUserFeature
- Add the Service Principal as a super user to Rights Management: Add-AIPSuperUser -ServicePrincipalId <AppPrincipalId>
Next Steps
To enter the AIP settings and credentials, open the MailMarshal (SEG) 10 Management Interface or SEG 8.x Configurator and navigate to MailMarshal Properties > Azure Information Protection. For further instructions, see Help for that window.